
That Bargain SD Card Might Be Lying to You… Here’s How to Check
Years ago, I helped a friend find a data recovery specialist after their drive failed.
The company had clean rooms, specialist equipment, the works… and they managed to recover over 90% of the data from a drive that had been dropped.
While I was there, the engineer said, “You work in IT… have a look at this.”
He handed me what looked like a reputable branded portable USB drive.
“What do you see?” he asked.
“Looks like a 4TB drive from a well-known brand”, I replied. “Was it in for recovery?”
He smiled… opened the case…
And inside was a tiny microSD card, glued into a cheap controller, surrounded by washers and scrap metal to make the weight feel right.
The customer had no idea. They thought they were storing terabytes of data.
In reality, the card was likely only a few gigabytes in size, with modified firmware designed to pretend it had far more capacity than it actually did.
By the time they realised something was wrong… most of their data was already gone.
On the surface, everything looks legitimate… branded SD cards, USB sticks, SSDs… often at prices that seem too good to pass up.
But behind the label, things aren’t always what they seem.
If you’re storing photos, videos, documents, or backups… how do you actually know the storage you’ve bought is genuine… and more importantly, reliable?
The Problem: When Storage Lies
That drive in the recovery lab was doing exactly this.
One of the more common tricks used by counterfeit or low-quality storage devices is firmware manipulation.
Simply put… the device lies about how much space it has.
A card might claim to be 128GB, but physically only contain 16GB of real storage.
At first, everything appears normal:
- Files copy successfully
- Photos open
- Videos play
But once you exceed the real capacity…
- New files overwrite old ones
- Corruption starts creeping in
- Data silently disappears
You won’t see an error, your data has now gone.
My Recent Test: “Refurbished” SD Cards
Recently, I picked up a batch of “refurbished” 32GB SD cards from eBay. The listing buried the word refurbished, which was very easy to miss…
When they arrived, something didn’t feel right… so I tested them.
Results:
- Refurbished card: ~1.7 MB/s write speed (Very slow)
- Brand new SanDisk A1: ~51 MB/s write speed (Quick Enough)
Same machine. Same reader. Same test.
The only difference? The card itself. Was it real or was it fake… After testing I believe its just a faulty card on it’s way to e-waste heaven…
How to Test Your Storage (The Simple Way)
You don’t need to be a tech expert to check the capacity of your storage media. There are free, trusted tools available for Windows, macOS, and Linux.
How do these tools work? The basic idea is simple:
- Fill the entire storage device with data
- Read everything back
- Check nothing is corrupted or missing
If the device is lying, this process will expose it and find the errors. This will be useful if you need to raise a return.
Tools You Can Use (Free and Trusted)
Lets take a look at the tools you can use to check the capacity and viability of your storage media.
Windows
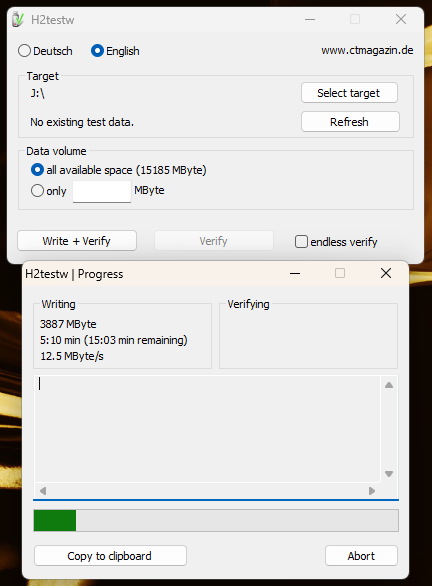
Windows users have the advantage of H2testw, a free GUI tool, no command line required. It’s one of the most widely trusted utilities for this purpose and has been for years.
H2testw
- Official site: https://www.heise.de/download/product/h2testw-50539
- Download (direct): https://www.heise.de/download/product/h2testw-50539/download
How to use:
- Insert your SD card
- Extract and run h2testw.exe
- Select your drive
- Choose “Write + Verify”
- Let it run (this may take some time)
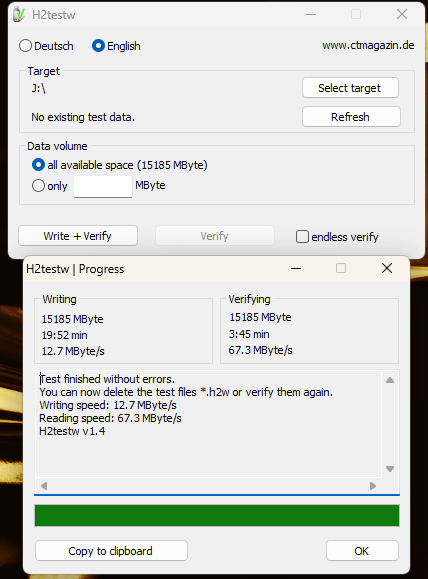
If the test is good, reformat the card or remove the files generated by the test program.
macOS
Unlike Windows, macOS doesn’t currently have a reliable GUI wrapper for flash testing, so we’ll use F3 via the Terminal. Don’t be put off, the commands are straightforward and you only need a handful of them. You will need to start the terminal program.
⚠️ Important: Be very careful to identify the correct disk or volume before running these commands. Some F3 operations (such as f3probe and f3fix) are destructive and will erase data on the device. Selecting the wrong disk could result in permanent data loss.
💡 Tip: If you’re unsure which disk is your SD card, run diskutil list, remove the card, run the command again, then reinsert it. The newly appearing disk entry will be your device.
Before running tests, you need to identify the correct disk or mounted volume for your SD card.
Insert the SD card, then open Terminal and run:
diskutil list
This will show all disks attached to your system. Look for your SD card by:
- Size (e.g. ~16GB, ~32GB, etc.)
- Name (often appears as NO NAME or similar)
Example output:
/dev/disk50 (internal, physical): #: TYPE NAME SIZE IDENTIFIER 0: FDisk_partition_scheme *15.9 GB disk50 1: Windows_FAT_32 NO NAME 15.9 GB disk50s1
In this example:
- The device is
/dev/disk50 - The mounted volume is
/Volumes/NO NAME
For the tool F3, you will typically use the mounted volume path:
/Volumes/NO NAME
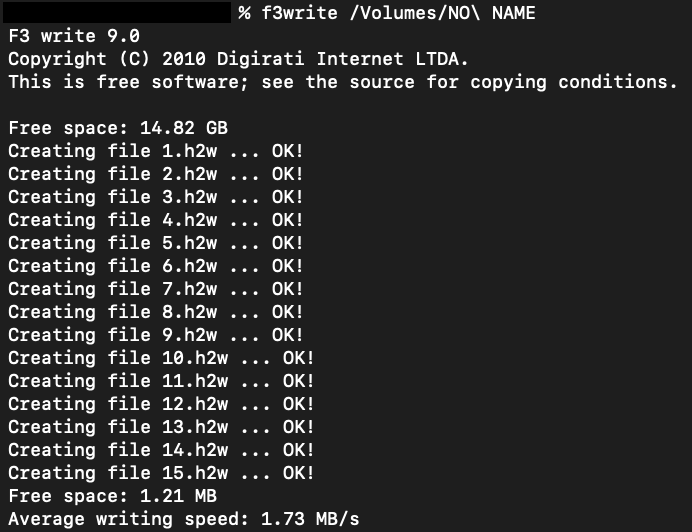
We’ll use a tool called F3 (Fight Flash Fraud)
Install Homebrew (if you don’t already have it):
Homebrew is a free package manager for macOS: https://brew.sh/
Open Terminal and run:
/bin/bash -c "$(curl -fsSL https://raw.githubusercontent.com/Homebrew/install/HEAD/install.sh)"
You can check that brew has installed correctly with :-
brew doctorbrew updatebrew upgrade
Install F3:
brew install f3
Run the basic test
First we write to the card, ensure it’s formatted first. Note the use of \ when the volume name contains spaces.
f3write /Volumes/NO\ NAME
If the write completes without failure, verify the card hasn’t corrupted any of the files using the following command :-
f3read /Volumes/NO\ NAME
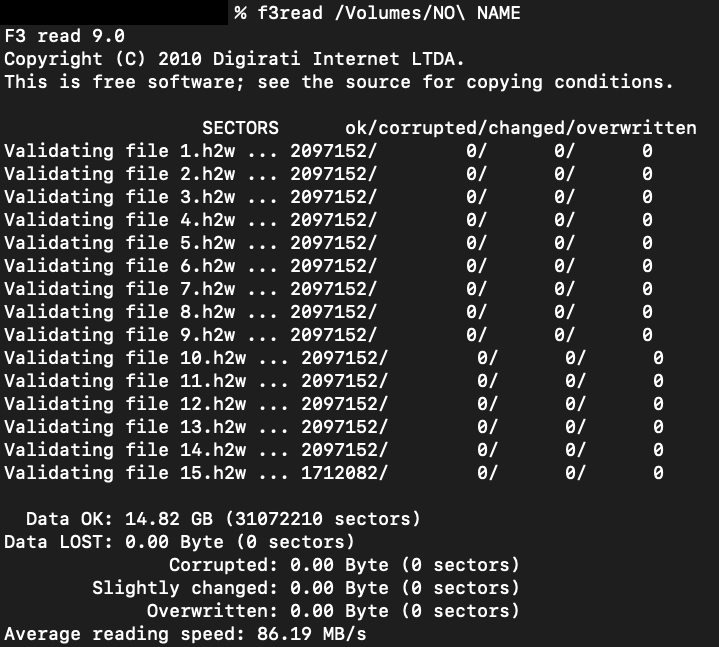
If the storage media performs close to its advertised speed, completes the test successfully, and shows no errors, you can be reasonably confident it is functioning correctly and safe to use.
If the storage shows errors, reports incorrect capacity, or exhibits significant slowdown, especially during sustained writes, it is likely degraded, faulty, or not as described, and should be replaced.
Additional useful F3 commands
F3 documentation: https://fight-flash-fraud.readthedocs.io/en/stable/
Quick probe (capacity check without full write):
Destructive: erases data on the device. Use on the device (e.g. /dev/disk4), not the mounted volume.
f3probe --destructive --time-ops /dev/disk50
When to use:
- You want a faster indication of real capacity than a full write/read
- You suspect fake capacity
Fix partition table to real capacity (after detecting issues):
f3fix /dev/disk50
What it does:
- Shrinks the partition to the actual usable size discovered by F3
- Prevents the OS from writing into non-existent/unsafe areas
When to use:
- The device reports a larger capacity than it really has
- You still want to repurpose the device safely (e.g. as a smaller card)
Linux
Install F3:
Installing F3 has slightly different commands than macOS, though once installed follow the instructions above for use of f3read, f3write etc.
sudo apt install f3 # Ubuntu/Debiansudo dnf install f3 # Fedorasudo pacman -S f3 # Arch
Run:
f3write /media/youruser/YOURCARDf3read /media/youruser/YOURCARD
What “good” looks like
A healthy storage device should:
- Match its advertised capacity
- Show zero errors during testing
- Maintain reasonable write speeds
If you see:
- Extremely slow speeds
- Errors or corrupted data
- Tests taking far longer than expected
Something isn’t right.
A word on “refurbished” storage
Refurbished flash storage is particularly risky. Unlike refurbished phones or laptops, you have no visibility into:
- How much it has been used
- How many write cycles remain
- Whether it is already close to failure
Flash memory wears out, and once it starts to degrade, it can fail quickly and without warning.
Practical advice
- Test new storage before trusting it
- Avoid deals that seem too good to be true
- Be cautious with refurbished SD cards and USB drives
- Never store important data on unverified media
- Always keep backups across multiple devices
Final Thoughts
Storage used to be one of those things that only ever got cheaper… more capacity, lower cost, year after year.
That trend is shifting.
Manufacturers are now reporting that much of their 2026 production is already allocated, driven largely by demand from data centres, AI workloads, and cloud expansion. We’re seeing similar pressures across memory and GPUs… and storage is following the same path.
In simple terms… demand is outpacing supply.
That has two knock-on effects:
- Prices are no longer falling the way they used to
- The market becomes more attractive to fraudsters pushing fake or misrepresented storage
And that’s where the risk sits.
When storage becomes more valuable, the incentive to fake it increases.
A cheap card that looks like a bargain might not just be “slow”… it might not even be the capacity it claims to be.
So whether you’re storing family photos, backups, or project data… it’s worth taking a few minutes to validate what you’ve bought.
Because by the time fake storage reveals itself… it’s usually too late.


very informative thank-you 👏
LikeLiked by 1 person