
Pharos/Microsoft GPS on Raspberry Pi

In 2006 I purchased the latest Microsoft Autoroute 2007 which came on DVD and offered a free GPS USB Dongle. The idea being you connected it your laptop and it was acting like an oversized SatNav. In reality it was ok for stationery vehicles. Balancing a laptop on the passenger seat wasn’t exactly safe, and wasn’t that accurate for real-time situations since the dongle needs an unobstructed view of the sky, besides i had one of the first TomTom SatNav devices in 2004, in-fact it’s still in a cupboard somewhere gathering dust.
I digress, sorting through stuff during lockdown, I stumbled upon the USB GPS Device that came with AutoRoute 2007 and thought “In 2021 Is it still useable?”, after all most gadgets more than 5 years old do become obsolete and end up on the techno junk pile.
The answer is “Yes“. Why? The Linux community are a creative bunch who do more for recycling older hardware than original equipment manufacturers and other mainstream OS makers, where driver support disappears after a short space of time. That’s a diatribe for another day.
Finding the information to configure and connect this old USB device to my Raspberry Pi wasn’t as straight forward as I hoped when I started this project a year or so ago, hence this article will cover off the basics of configuring and adding the GPS Receiver to your Pi, and fast forward to 2021 it’s more straight forward than when I first started. Again, thanks to the Linux community constantly evolving and improving the OS with each iteration.
Step 1 – Identify the Hardware
Connect the USB GPS Receiver to the Raspberry Pi. One of the USB2.0 ports is fine given the low power draw (10ma at 5V) required and it was designed before USB3 was available to the public.
From the Pi Terminal issue the lsusb command
pi@raspberrypi:~ $ lsusb
Bus 002 Device 001: ID 1d6b:0003 Linux Foundation 3.0 root hub
Bus 001 Device 003: ID 067b:aaa0 Prolific Technology, Inc. Prolific Pharos
Bus 001 Device 002: ID 2109:3431 VIA Labs, Inc. Hub
Bus 001 Device 001: ID 1d6b:0002 Linux Foundation 2.0 root hub
We’re interested in the device listed as Prolific Technology. Since it’s the first USB Serial device connected to the Pi it should be running on /dev/ttyUSB0 but how do we check that?
pi@raspberrypi:~ $ cat /var/log/syslog | grep -i Prolific
Apr  9 00:11:54 raspberrypi kernel: [ 6581.541041] usb 1-1.3: Manufacturer: Prolific Technology Inc.

pi@raspberrypi:~ $ cat /var/log/syslog | grep -i tty
Apr  9 00:11:54 raspberrypi kernel: [ 6581.661970] usb 1-1.3: pl2303 converter now attached to ttyUSB0

pi@raspberrypi:~ $ cat /var/log/syslog | grep -i 067b
Apr  9 00:11:54 raspberrypi kernel: [ 6581.540981] usb 1-1.3: New USB device found, idVendor=067b, idProduct=aaa0, bcdDevice= 3.00

pi@raspberrypi:~ $ ls -l /dev/ttyUSB*
crw-rw---- 1 root dialout 188, 0 Apr  9 00:11 /dev/ttyUSB0

pi@raspberrypi:~ $ dmesg
[    0.000000] Booting Linux on physical CPU 0x0
...
[ 6581.405772] usb 1-1.3: new full-speed USB device number 3 using xhci_hcd
[ 6581.540981] usb 1-1.3: New USB device found, idVendor=067b, idProduct=aaa0, bcdDevice= 3.00
[ 6581.541005] usb 1-1.3: New USB device strings: Mfr=1, Product=2, SerialNumber=3
[ 6581.541024] usb 1-1.3: Product: USB-Serial Controller D
[ 6581.541041] usb 1-1.3: Manufacturer: Prolific Technology Inc.
[ 6581.541058] usb 1-1.3: SerialNumber: 12345678
[ 6581.645301] usbcore: registered new interface driver usbserial_generic
[ 6581.646472] usbserial: USB Serial support registered for generic
[ 6581.649672] usbcore: registered new interface driver pl2303
[ 6581.649736] usbserial: USB Serial support registered for pl2303
[ 6581.649846] pl2303 1-1.3:1.0: pl2303 converter detected
[ 6581.661970] usb 1-1.3: pl2303 converter now attached to ttyUSB0
We know that the USB device connected at 00:11, yep I’m up late! And I can see a new device was assigned ttyUSB0, and a match on the Vendor ID and Product ID returned after the lsusb command.
Checking file /dev/ttyUSB0 reveals it’s creation date around the same time the device was connected to the Pi.
The dmesg command read the kernel ring file and displays relevant info. At the end of the list you’ll see the USB GPS Receiver connecting and identified with driver PL2303 and connected to ttyUSB0.
If you’re connected to another ttyUSBx file then make a note of it.
Step 2 – Install the GPS Packages
If you haven’t already, you’ll need to install the GPS Daemon package, which again (thankfully) is straight forward (unlike the 90’s)…
pi@raspberrypi:~ $ sudo apt install gpsd gpsd-clients
Reading package lists... Done
Building dependency tree
Reading state information... Done
The following additional packages will be installed:
  libbluetooth3 libgps23 python-gps
The following NEW packages will be installed:
  gpsd gpsd-clients libbluetooth3 libgps23 python-gps
0 upgraded, 5 newly installed, 0 to remove and 0 not upgraded.
Need to get 7,735 kB of archives.
After this operation, 9,865 kB of additional disk space will be used.
Do you want to continue? [Y/n] Y

...

pi@raspberrypi:~ $ sudo reboot now
Issue the sudo apt install gpsd gpsd-clients command at the terminal, and these packages will be installed after a few minutes. Make sure you are connected to the internet.
Why apt and not apt-get?
apt-get has more to offer in terms of switches and lower level capability, whereas apt is a wrapper for apt-get which has fewer options but does more under the hood than apt-get alone. This is becoming the “Standard” for Linux scripts. You can find out more here: https://itsfoss.com/apt-vs-apt-get-difference/
You will need to reboot your device for the new gpsd Daemon to take effect.
pi@raspberrypi:~ $ ls -l /dev/gps0
lrwxrwxrwx 1 root root 7 Apr  9 00:51 /dev/gps0 -> ttyUSB0
Once the reboot is complete, a new link is created from /dev/gps0 -> ttyUSB0 or the USB assigned by the Pi.
Step 3 – Configuration
Next we need to configure the GPS Daemon to communicate with our device. Depending on the user you are using on your Pi, you will need to be a member of the dialout group.
pi@raspberrypi:~ $ groups
pi adm dialout cdrom sudo audio video plugdev games users input netdev lpadmin gpio i2c spi
Use the groups command and check you are part of the dialout group, if not you may need your administrator to issue the following command.
sudo usermod -a -G dialout username
Replacing username with your own.
If you issue a cat /dev/ttyUSB0 there’s no data being captured. Why is that?
- Any data has been read and popped off the file.
- System hasn’t been rebooted after installing the packages.
Issue the command below to switch to NMEA mode and if all is connected you will see the message below.
pi@raspberrypi:~ $ gpsctl -f -n /dev/ttyUSB0
/dev/ttyUSB0 identified as a SiRF at 4800 baud.
gpsctl:SHOUT: switching to mode NMEA.
If you see an error message you may need to restart the Daemon.
pi@raspberrypi:~ $ gpsd /dev/ttyUSB0
Whilst no locks are on the file stream, you will be able to see data flow from the GPS device using the following: –
pi@raspberrypi:~ $ tail -10lf /dev/ttyUSB0
$GPGGA,000139.033,,,,,0,00,,,M,0.0,M,,0000*5D
$GPGSA,A,1,,,,,,,,,,,,,,,*1E
$GPRMC,000139.033,V,,,,,,,160406,,,N*43
$GPGGA,000140.033,,,,,0,00,,,M,0.0,M,,0000*53
$GPGSA,A,1,,,,,,,,,,,,,,,*1E
If you’re still experiencing issues, jump to the Troubleshooting Section.
Step 4 – Monitoring Tools
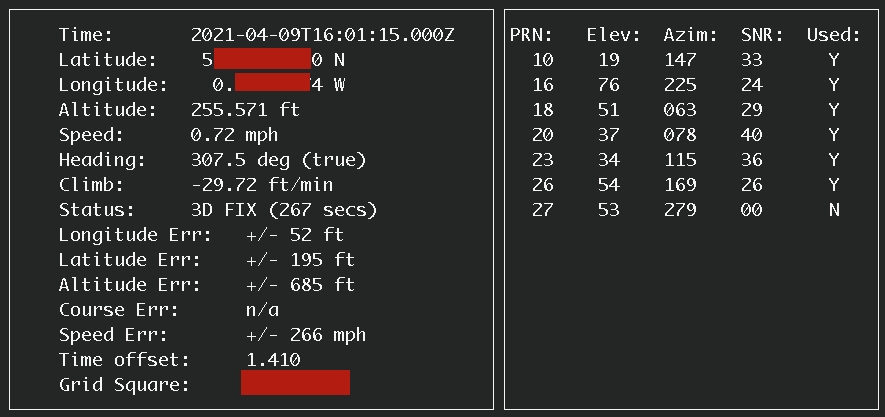
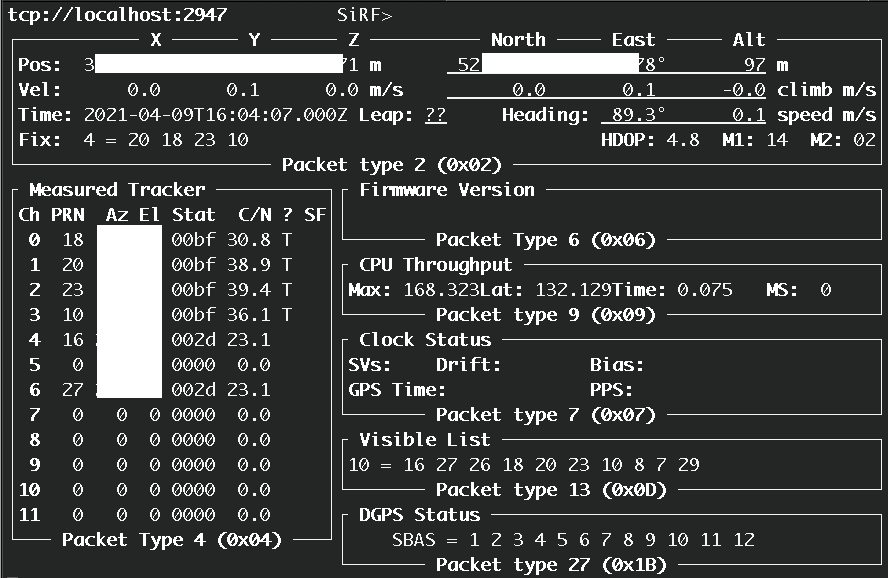
With the GPS receiver configured, how can you determine if it’s actually working? There’s a couple of inbuilt tools gpsmon and cgps which will make life easier. It may take a couple of minutes for the GPS Sensor to obtain a GPS lock, patience is needed.
Once the GPS has a lock on position you will see something like below, though I’ve masked my location.
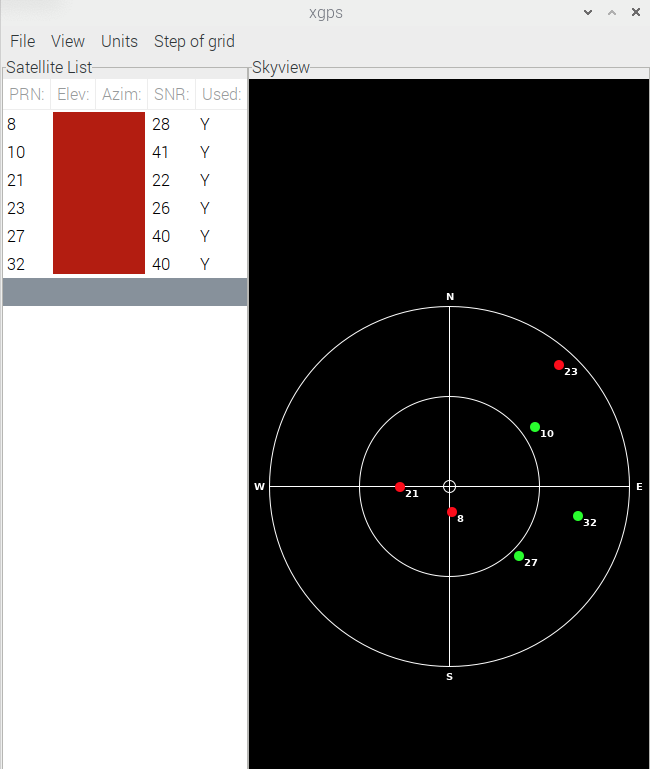
If you’re running Raspbery Pi Desktop you also have a visual aid in the form of xgps from the terminal issue the following command.
pi@raspberrypi:~ $ xgps
If you see the following error message, you may need to install pycairo
pi@raspberrypi:~ $ sudo apt install python-gi-cairo
Reading package lists... Done
Building dependency tree
Reading state information... Done
The following NEW packages will be installed:
  python-gi-cairo
0 upgraded, 1 newly installed, 0 to remove and 0 not upgraded.
Need to get 24.1 kB of archives.
After this operation, 46.1 kB of additional disk space will be used.
Get:1 http://mirror.mythic-beasts.com/raspbian/raspbian buster/main armhf python-gi-cairo armhf 3.30.4-1 [24.1 kB]
Fetched 24.1 kB in 0s (70.1 kB/s)
Selecting previously unselected package python-gi-cairo.
(Reading database ... 168162 files and directories currently installed.)
Preparing to unpack .../python-gi-cairo_3.30.4-1_armhf.deb ...
Unpacking python-gi-cairo (3.30.4-1) ...
Setting up python-gi-cairo (3.30.4-1) ...
Once all is resolved, you’ll see a sky map like below showing the position of GPS Satellites relative to your position.
And that in a nutshell is how to enable a Serial USB GPS Receiver on Raspberry Pi, though these instructions will work on different Linux flavours.
Question is what am I going to do with this new found knowledge? I need a project that involves GPS that’s not SatNav… Going to have to think this one through.
Step 5 – Trouble Shooting
Like anything, sometimes things go wrong, it could be user error, hardware error or those bloomin’ gremlins mucking up your well oiled system.
Kill the gpsd service
$ sudo killall gpsd
$ sudo rm /var/run/gpsd.sock
Restart the service
$ sudo gpsd /dev/ttyUSB0 -F /var/run/gpsd.sock
Obviously replace ttyUSB0 with the correct filename for your device.
If that doesn’t work, check this out. https://gpsd.gitlab.io/gpsd/troubleshooting.html
Resources
| Troubleshooter | https://gpsd.gitlab.io/gpsd/troubleshooting.html |
| Not working after Reboot | https://raspberrypi.stackexchange.com/questions/29547/cant-get-gps-to-automatically-work-after-reboot |
| SiRF Binary Protocol | https://cdn.sparkfun.com/datasheets/Sensors/GPS/SiRF_Binary_Protocol.pdf |
| Why GPSes Suck | http://esr.ibiblio.org/?p=801 |

