
Building a Retro Gaming System with Raspberry Pi

I’ve been tinkering with Raspberry Pi since they first came on to the market in February 2012. For such a cheap computer module, it packs a lot of features. The first RPi cost about £35 and more powerful than the Escom 486 DX 4-100 with 8mb of Ram I purchased in the 90’s for nearly £1200!
The Pi Zero is a decent bit of kit in the range being very small, portable, and costs around £4… yes that’s right £4, or you can get ones with built in WiFi and Bluetooth for under a tenner.
When I get a spare moment (rare) I’ll tinker with a Pi wishing we had something like this in the 70’s and 80’s, so many possibilities in such a small form factor. I would play around with microelectronics with D-Type and JK Flip Flops etc as a kid, building anything from simple timers, amplifiers to more complex circuitry. Had one of these been available, the opportunities would have been endless and todays new generation have something amazing to work with in terms of creation and design.
I’ve been fascinated by the quality of emulators creators have adapted to run on the Pi and have I’ve built a couple of old school gaming rigs for this very task.
There was a time it became trendy amongst hackers to update their GameBoy’s with a colour screen, and adapt it with Pi gaming, but I don’t posses the skills required for this and was pleasantly surprised you can purchase a prebuilt GameBoy style case for your retro gaming on the go, it would be rude not to!
This project took around 10 minutes, in total, and with the current lockdown with Covid-19, what would be a better way for parents and children to try building a gaming device for yourselves?
The joy of building, configuring and playing thousands of retro games available elsewhere on the internet (Google is your friend).
The total cost of the this project was under £79 (excluding P&P) and here’s how you can build a multi-games unit capable of running thousands of arcade games!
Step 1 – The Parts You’ll Need
- The RetroFlag GPi Case (About £60)
- https://thepihut.com/products/retroflag-gpi-case-gameboy-inspired
- This comes with the case, rear cartridge and a short USB Power cable to save battery whilst you configure and set up the pi.
- Raspberry Pi Zero (without header) (Under £10)
- https://thepihut.com/collections/raspberry-pi/products/raspberry-pi-zero-w
- I used the Pi Zero W (Built in Wireless and Bluetooth) but you can use the cheaper Pi Zero but that will add additional complexity to the project as you won’t be able to access the device over WiFi, and won’t be covered in this article.
- Micro SD Card
- Minimum of 16gb, depending on the number of game images you have you may need a much bigger card.
- Minimum of 16gb, depending on the number of game images you have you may need a much bigger card.
- Three AA Batteries
Step 2 – The Software
- RetroPie for the Pi Zero
- GPi Patch
- http://download.retroflag.com
- This patch contains everything you need for Audio, Buttons and Screen Configuration
- balenaEtcher
- https://www.balena.io/etcher/
- This will help you image the micro SD Card easily and simply.
- PuTTY (If you’re running Windows)
- https://www.chiark.greenend.org.uk/~sgtatham/putty/latest.html
- Or your favourite SSH program. macOS and Linux users have a built in command line SSH tool.
Step 3 – The Initial Build – Assembly
This is a surprisingly easy project. Make sure all parts are available. The cartridge in the back of the GPi case slides out easily like the original GameBoy cartridge did.

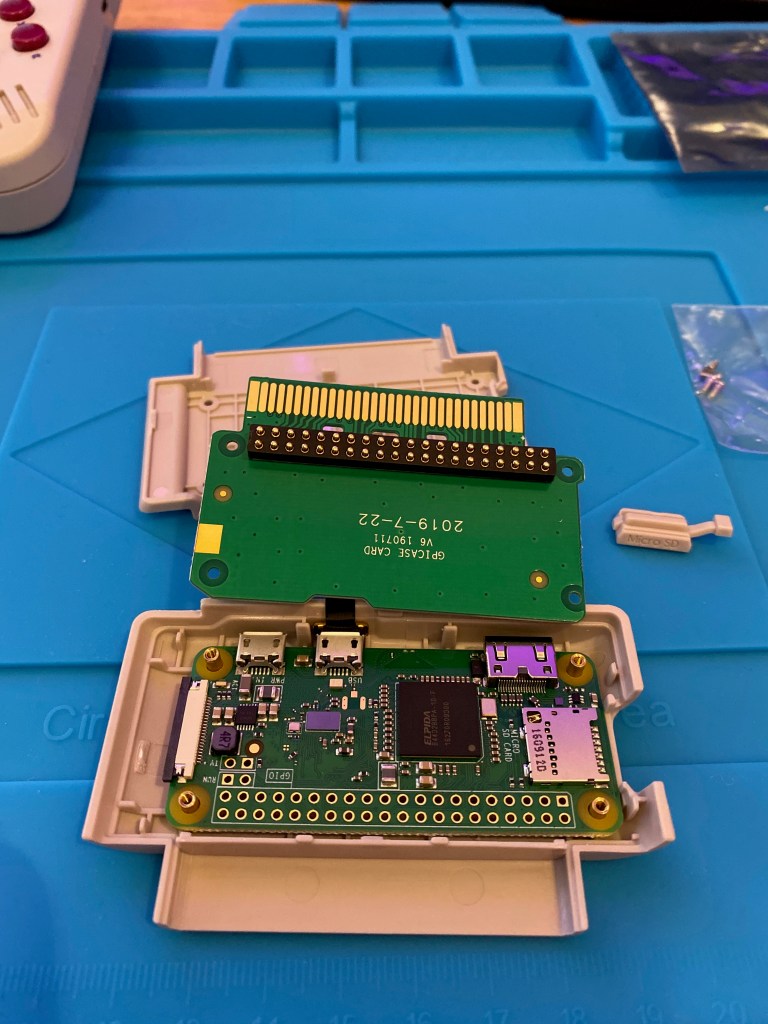
The cartridge case snaps open, so carefully separate the two parts, you’ll find a board already inside with a micro USB connector.

Plug the Pi Zero with the board connector as shown. Be careful not to touch the circuitry on both boards.

Slot the Pi Zero into the case with the four brass pillars like thus.
Align the top board to the screw holes and add the microSD Card Cover before you close the case up.
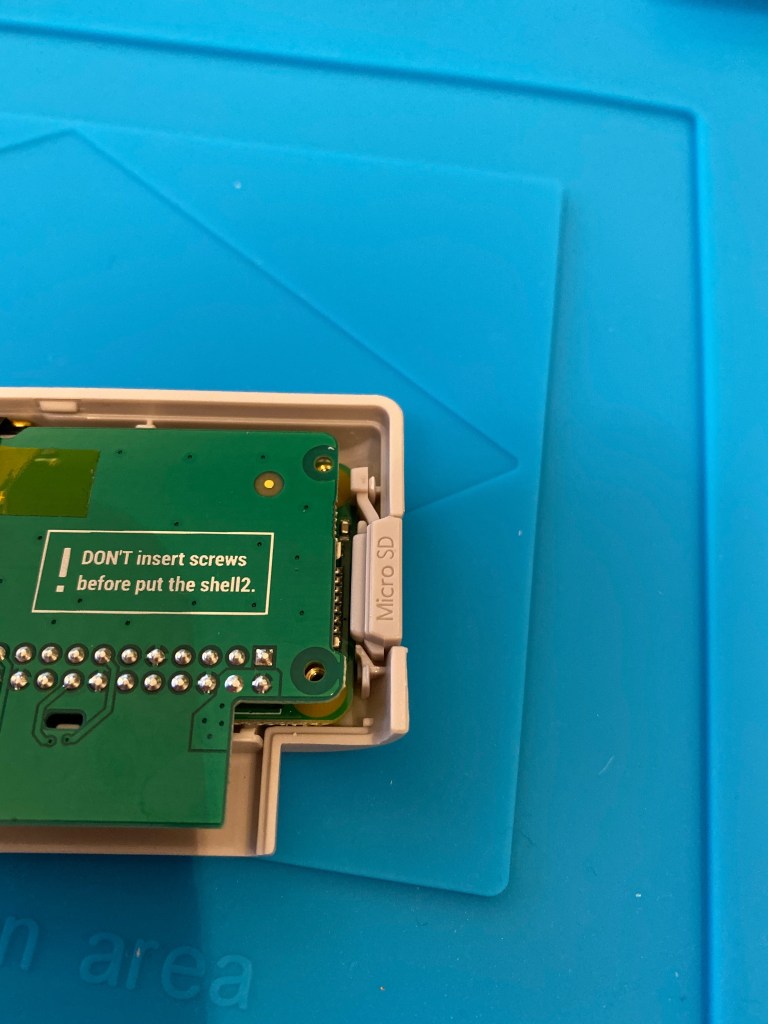


Add the four screws to the back of the cartridge, double check that the circuit boards haven’t covered the holes before you seal the case as you may end up damaging the boards.
Take a look at the back of the GPi and remove the battery cover. You will find a switch which you’ll need to move to the ON position. If you don’t enable this switch you have to ensure you shutdown the gaming system correctly otherwise you will corrupt your memory card. So just set it to the ON position and we’ll cover installation of the script to use this feature shortly.
Warning – Don’t be tempted to switch the system on just yet!
Step 4 – Software Installation
The software links have been provided in the article above. You will need to install and configure Retropie on a spare microSD Card (I recommend 16gb, however 8gb is perfectly fine for the job.
- Install balenaEtcher on your PC/Mac
- Click Select Image and Select the Retropie Image you downloaded above.
- Select the SD Card you will be installing the software and click Flash!
The software will install the RetroPie Image as a bootable SD Card and verify that it has been installed/imaged correctly. Etcher will automatically eject the sd card when complete, you will need to physically remove the SD Card and re-insert it to your device for the next steps.
Step 5 – GPi Configuration
Here’s the tricky bit, and the following video is to help make sense of the installation and configuration process.
The main steps are as follows :-
- Flash the Retropie (for Pi 0) onto your SD Card and validate the card has been imaged correctly.
- Insert the MicroSD Card into your computer and look for the “boot” volume/drive name.
- Create a blank file in the root directory called “ssh” there should be no extension.
- Edit and copy to the card the wpa_supplicant.conf file replacing the WiFi Network Name and WiFi password with your own.
- Download the GPi Patch Files for the case from http://download.retroflag.com, copy the config.txt to the SD Card, and the two files in the Patch Overlays folder to the SD Cards Overlays folder.
- Make sure the GPi switch (where the batteries are located is switched to the ON position).
- Power up the GPi, I recommend using the provided power cable and a spare USB port as it will drain batteries within a couple of hours.
- The initial boot up will take a few minutes whilst configuration takes place.
- You will be presented with a screen asking to hold a button and then configure the buttons for the GPi, follow the instructions on screen, and for buttons that don’t exist, simply hold down any configured button to skip that step.
- Remember to use the SELECT Button for the Hot Key
- DO NOT POWER OFF THE GPi at this point.
- Navigate to the Retropie menu and press the A button.
- Scroll down and select Show IP address
- If an IP address is not showing, then something will be wrong with the WiFi password/network name, please check and try again. Check the video on how to obtain the information.
- Using the IP address, use your favourite Terminal Secure Shell program (Windows users can use PuTTY, macOS/linux users can use Terminal)
- Connect using pi@yourIPAddress, i.e. ssh pi@192.168.0.68
- The default password is raspberry
- When first connecting you will be asked to confirm the devices fingerprint and if you really want to connect. Select YES and continue, the Raspberry PI Banner will display.
- Using the terminal, issue the following command :-
- wget -O – “https://raw.githubusercontent.com/RetroFlag/retroflag-picase/master/install_gpi.sh” | sudo bash
- This will install the safe shutdown script to the GPi, it may take a while depending on your connection speed and other factors, please be patient and don’t be tempted to power off the device.
- Once complete the GPi will reboot and this time it should be quicker to start up.
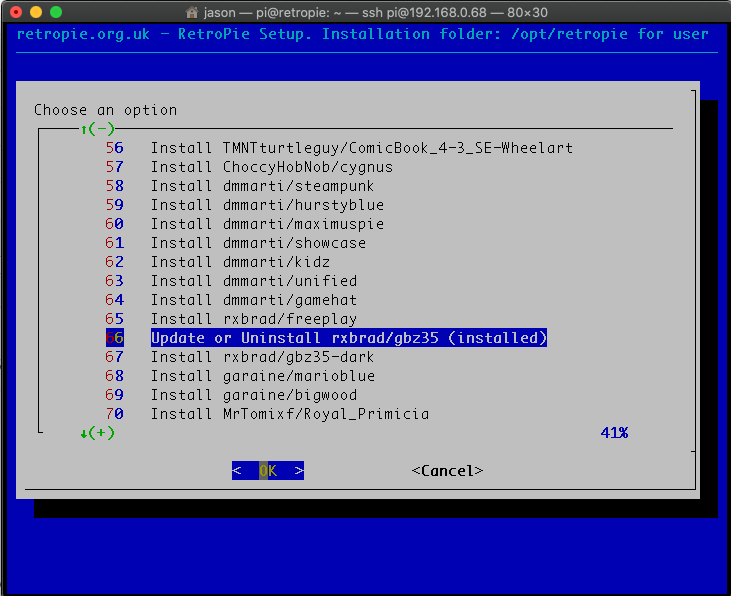
- Connect to the Raspberry Pi once again to easily download and install the GBZ35 Theme that is suitable for small screens. Using Step 16
- Enter the following command :-
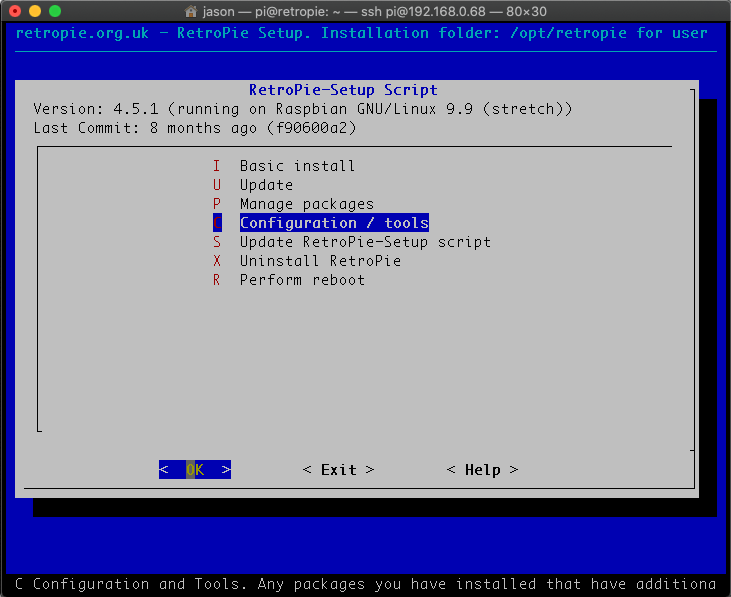
- sudo ~/RetroPie-Setup/retropie_setup.sh
- Select Configuration/Tools from the menu using cursor keys and enter.
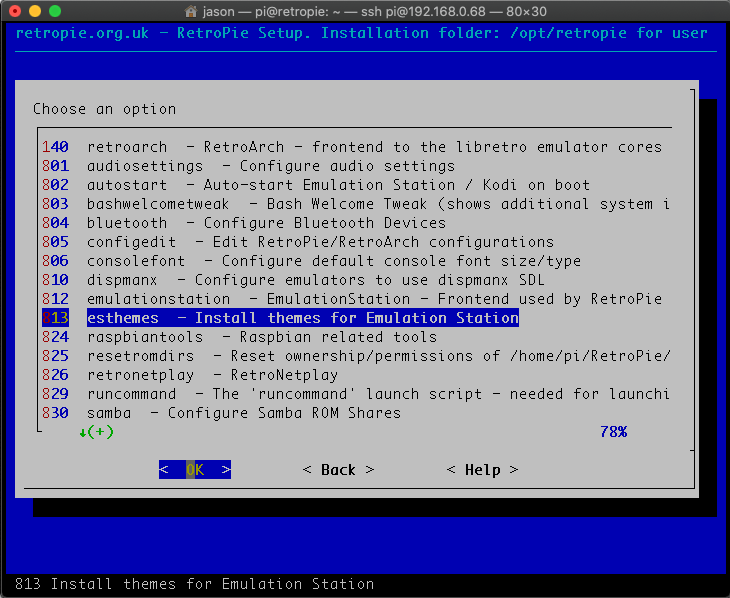
- Select 813 – esthemes and hit Enter
- Find GBZ35 Theme, Hit enter and wait for the theme to download and install itself to your GPi.
- You can exit the configuration program at this point.
- At the menu screen of RetroPi, press the START button of the GPi, this will show the Emulation Station configuration menu, select UI Settings and press A
- Scroll down the list of options until you find THEME SET and press A
- Select the GBZ35 Theme from the list and press A
- Press the B key to go back from the menu and finally press the START button again to exit the UI menu.
- Congratulations, you’ve now configured and installed Retropie on a Pi Zero and Retropi case, with safe shutdown scripts. All that remains is to install your favourite retro games to the device to play and I will cover this off in a separate blog article.
wpa_supplicant.conf configuration file
country=GB
ctrl_interface=DIR=/var/run/wpa_supplicant GROUP=netdev

#RETROPIE CONFIG START
network={
    ssid="YourWIFINetworkName"
    psk="YourWIFIPassword"
    key_mgmt=WPA-PSK
    scan_ssid=1
}
#RETROPIE CONFIG END
Screen shots of Terminal Session


Excellent comprehensive article and tutorial thanks for sharing!
LikeLiked by 1 person