
Amstrad and ZX Spectrum DSK Tool
I was looking at some potential differences between retro machine emulation and physical hardware.
Emulation has come on a very long way since the first versions rolled out the door in the early 90s. The expertise within the retro community is incredible, the internet has only accelerated the sharing of ideas, tools, modern hardware interfacing to legacy kit to anyone with a connection. Imagine this in the early days of BBS systems that were only accessible to the few.
I have over Three Hundred Three Inch disks. Yep you read that right, Three inch not Three and Half.

There came a point that some clever bods realised, archiving these disks would be required as physical hardware was no longer being made, plus it made the job of an emulator easier to load virtual disks than physical ones.
A standard evolved, the DSK file format is used across many emulators. The virtual disks not only had to capture data on each physical track and sector, but also needed to record information about each track. Including GAP#3, Filler Byte, Sector IDs, Controller Response codes for each sector, since protection systems could use weak sector protection (CRC Check Failure), invalid Sector ID information and more. Why? many of the disks archived today have the original protection systems in place, and so emulators need to act like the real disks would. Many hackers and crackers have removed these protections many times over, but there’s something about having a preserved original as intended for historical reference.
It looks like the DSK standard stabilised around 1997 looking at the sample of 11,000+ DSK image files I’ve been able to find and test. I’ve seen what appears to be implementations that are a bit loose or stray from the standard we know today, and that is to be expected as new use case scenarios were discovered.
Emulators today do an awesome job of handling these files and some of the nuances whilst the standard evolved too. My focus is on my own disk collection that I used GreaseWeasle and HXC to archive by connecting a Three Inch drive to my mac. I’ve linked some previous articles below.
I started off with a need to view Track and Sector Information on each DSK Image file, I was looking for specific protection systems and the project just grew…
Do you need it?
Most likely not, emulators cover a vast majority if not all of what I’m doing here, there are also Windows based UI tools that will do a much better job.
I required a command line tool to look at, report and extract files from my disks, without having to load each one up in an emulated environment independently.
The code for this project is found here :-
https://github.com/muckypaws/AmstradDSKExplorer
You will need Python 3.9 or higher, installed on your device. Also Git or GitTools will help but not necessary.
If you’re familiar with git…
cd ~
git clone https://github.com/muckypaws/AmstradDSKExplorer.git
cd AmstradDSKExplorer
Any future releases can easily be managed by:-
cd ~
cd AmstradDSKExplorer
git pull
Or you can download the ZIP bundle and install on your device.
If you want to skip straight to how the tool is used, you can skip to this point.
What is the DSK File Standard?
I used the documentation found here:-
https://www.cpcwiki.eu/index.php/Format:DSK_disk_image_file_format#SECTOR_INFORMATION_LIST
There are some variations to the initial standard, The Eye-Catcher in the DISK Header can help give us a clue which standard to apply. An example shown below.

The example above, shows the Disk was created with JavaCPC possibly my favourite Amstrad CPC emulator available, and it works on macOS, Linux, Windows, RaspberryPi, pretty much anything that supports Java and has a half decent display. The emulator is OpenSource and maintained by my good friend @DevilMarkus.
https://sourceforge.net/projects/javacpc
I’m using the DizzyHackTutorial Disk found in my earlier article for reference.
The Disk Image contains 40 Tracks, Single Sided (#40, #01 Byte Combo at 0x00030), And each Track is #1300 bytes in size, 256 Bytes for the Track Header Info and #1200 bytes in Sector information.
Track Info
Each Track can be indexed as an offset from the start of main file + 256 Bytes.
Track Info contains blocks of 8 bytes for each sector on the disk. After the Eye-Catcher we’re informed that each sector size is 2, which means 2^(7+2) or 2^9 = 512 Bytes, there are Nine-Sectors per track, GAP#3 has a length of #4E and the filler byte is #E5. Directly after #E5 are nine sector descriptors starting with (#00,#00,#C1,#02,#00,#00,#00,#02)

Breakdown: –
- #00 – Track Number
- #00 – Head Number (0 = Side A, 1 = Side B)
- #C1 – Sector ID
- #02 – Sector Size – 2^(7+2)
- #00 – FDC Status Register 1
- #00 – FDC Status Register 2
- #0200 – Real Sector Size – 512 Bytes (Little Endian Word, #00 #02 = #0200)
Sector Information – Directory Entry Table
Amstrad CPC used a DATA format of 40 tracks per disk, with sector IDs #C1 -> #C9 interleaved on the disk for performance reasons.

CPM2.2 Directory Entry
Each Directory Entry contains information for up-to 16kb of segments of file information. If a file is greater than 16kb – 128 Byte Disk Header (16256 Bytes) then additional entries are created. The largest file which can be stored on an Amstrad CPC Disk is 64kb that works with AMSDOS. This will create 5 entries in the directory table for the file.
Lets take an example record.

It’s broken down as follows :-
| Byte Offset | Description |
|---|---|
| 0 | User Number |
| 1-11 | Filename (excluding full stop) |
| 9 | Bit 7 Set for Read Only |
| 10 | Bit 7 Set for Hidden/System |
| 11 | Bit 7 Set for Archive |
| 12 | Current Extent (0 is first extent) |
| 13 | Reserved |
| 14 | Extent High Byte (Not Used) |
| 15 | Record Count (Number of 128 Byte Blocks) |
| 16 – 31 | Cluster ID where to find the file data. |
in the example above, we know that the File ADAM.BIN has a maximum length of #5C – 92Decimal (128 Byte Records) size of 11776 bytes (92 * 128). Being less than 16kb we know there’s no more directory entries. Our file can be found on Clusters 03, 04, 05, 06, 07, 08, 09, 0A, 0B, 0C, 0D, 0E. Files cannot exist on Cluster 00 or Cluster 01, Therefore a Zero byte is termination of the Cluster Info within offsets 16-31.
Like any disk in that time period, you can not rely on files existing on clusters being sequentially numbered. Why?
If you have a blank disk and write files to it, sure the clusters will follow sequence. At some point, files will be erased and new files created, this creates fragmentation across the disk since new files will always start from the first free cluster available.
What is a Cluster?
Great question… The disk is organised in blocks of 1Kb in size, and in the Amstrad CPC Normal file system, two 512 Sectors. Clusters are numbers 02 – Size of Disk.
We have to calculate the correct track and sector to locate data. Thankfully that’s a simple calculation.
Track = (Cluster * 2) / 9
SectorOffset = (Cluster * 2) mod 9
Where the number of sectors per track is 9.
Depending on the Disk Format (IBM, DATA or VENDOR) the start sector must be added to the sector offset as shown below.
- DATA -#C1
- SYSTEM – #41
- IBM – #01
Using the example above with a DATA Formatted DSK Image:-
- Cluster ID of 03 = Track 0 and Sector #C1 + 6 = #C7 and #C8 (Two Consecutive 512 Byte Sectors).
- Cluster ID of 04 = Track 0 and Sector #C1 + 8 = #C9 and Track 1 Sector #C1 (Two Consecutive 512 Byte Sectors).
To read the entire file, we enumerate each Cluster and load the data into memory.
What about files > 16256 Bytes?
For larger files, it gets interesting…
Directory entries are not guaranteed to be in sequential order (remember fragmentation), saving a file of size 65535 bytes (The maximum permitted in Amstrad BASIC), results in five entries in the Directory Table.
Each entry is located in the first available space in the directory structure. I deleted a file which means the descriptors for the file LARGE.BIN are located at Sector Byte Offsets #0020, #0060, #0080, #00A0 and #00C0. The extents are labelled (00, 01, 02, 03, 04) accordingly.

First Sector of File
Going back to our earlier example, we’ll take a look at our file ADAM.BIN and the first sector of information held. The offset in the file was calculated by matching the Sector ID #C7 in the Track Table which shows it to be the Fourth Entry in the Sector Table. We calculate our offset into the file as (4 * 512 bytes)


Loading the complete file is simply repeating the process for all cluster entries.
Think we’re done? nope… The Amstrad CPC has two types of files. A structured file with header describing details of the file, length, load address, type, execution address etc. or… an unstructured file that contains records (Like a database), and doesn’t contain a file header. You could create an easy headerless file by using the command SAVE”MYPROG.BAS”,A to save a BASIC file as ASCII.
How can you determine which is which?
Detecting File Headers
SOFT968 – The Amstrad CPC Firmware Guide describes how the presence of a header could be detected in the image below.
Admittedly for many years I genuinely thought there was a typo believing the header to be only 64 bytes. As the sector data I’d looked at historically, headers appeared to contain valid binary data from bytes 65 onwards… turns out this was undefined data in the buffer (often copies of the buffer of data about to be written).
We need to run a simple checksum, by summing all the bytes from position 00-66 and comparing it to the checksum stored in bytes 67/68 (Stored little endian). If there’s a match, we have a valid file header. if it doesn’t match then we have a headerless file (ASCII Records).
The length of the actual file (excluding the 128 byte header) is also present at offsets 65/66 resulting in an actual file length of #2D77 and the checksum (Summing all the bytes from offset 0 through to 66), is recorded as #2400. If you want to calculate this by hand you will see this is indeed true.
For headerless files, we can not determine the true length from the directory headers. We can assume the number of records * 128 from the directory entry, but true length is to read all the data until a SOFT-EOF #1A byte is encountered.
If you used the headerless format to write data, AMSDOS would drop any data after the #1A byte was detected. Any data written after that byte will be ignored by AMSDOS.
Of course there is a problem with this solution, it’s possible to craft an ASCII record with a valid checksum pair of bytes in position 67/68 though the likelihood was a rare occurrence.


Phew… that’s a-lot to take in, I recommend experimenting with disk images you find, using a hex editor or hex viewer. I’m using Synalyze It! on macOS, available from https://www.synalysis.net, it’s quite a powerful tool allowing me to create “Grammar” files that define file structures for easy viewing. The tool includes many Grammar files for many popular file formats, ZIP, TAR, GIF etc. If you’re on Windows, you may want to checkout: https://hexinator.com, grammar files are supported across both programs.
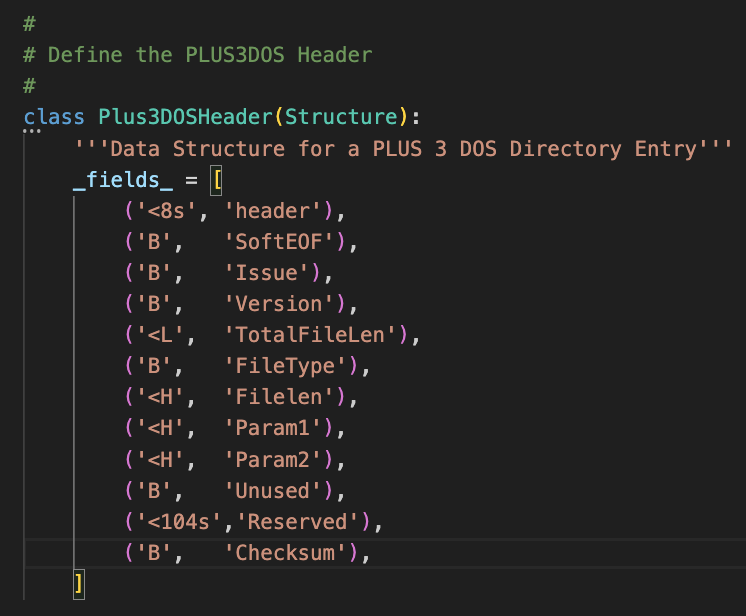
PLUS3DOS
As I was developing the tool, I took a quick peek at the ZX Spectrum +3 DSK Image files, and decided to implement support for this too.
The key difference, is the PLUS3DOS File Images I looked at were IBM Formatted with 9 Sectors instead of 8 supported on the Amstrad CPC.
Directory Entries remain CPM2.2, including the same Cluster format to point to where files are stored on disk. That made it easier, plus all data sectors where files are stored all have a 128 Byte Header with PLUS3DOS as an eye catcher.

I just needed to know how the header was constructed. This resource was very helpful:
https://area51.dev/sinclair/spectrum/3dos/fileheader so please check it out as there’s a wealth of information for the technical community. Peter has done an impressive job keeping all this information in one easily accessible place.
Key differences are, ZX Spectrum Programs do not have an ENTRY address recorded, in keeping with the cassettes of old.
The support I’ve added is minimal and experimental, though the limited sample I’ve tried it on works well.
What Does DSKUtilV3 do?
In a nutshell (at the time of writing) :-
- Displays File Information on Disk
- -dir Simple File Listing
- -dir -ds Detailed File Information (Load Address, Length, Execution Address), FileType
- -dh Displays Disk Header Information, Including basic track details and number of sectors.
- -ds Displays Disk Sector Information (Similar to Discology)
- -f Creates a Blank Formatted DSK File ready emulation use.
- -ex Extracts All Files from the DSK Image to your OS
For the most up-to-date information check the projects README file over on the GitHub Project Page: https://github.com/muckypaws/AmstradDSKExplorer
Display File Information
python3 DSKInfoV3.py -dir DizzyHackTutorial.dsk

Display Extended Disk Information
python3 DSKInfoV3.py -dir -d DizzyHackTutorial.dsk

Display Disk Header Information
python3 DSKInfoV3.py -dh DizzyHackTutorial.dsk

Display All Disc Sector Information
python3 DSKInfoV3.py -ds DizzyHackTutorial.dsk

Display Sector Information Between Track X through to Track Y
You can use the optional -TS and -TE parameters. TS = Track Start, TE = Track End
python3 DSKInfoV3.py -ds -ts 20 -te 22 DizzyHackTutorial.dsk

Create a Blank Formatted DSK Image File
It’s probably unlikely you’ll need this feature given that almost all emulators include the facility to create blank disks. I just added it… because…
There are a number of parameters needed :-
| Parameter | Description |
|---|---|
| -f or –format | Create a New Disk Image FIle |
| -ft or –formattype type | Type = 0 – DATA 1 – VENDOR 2 – IBM 3 – ZX Spectrum IBM Format Default = 0 DATA if not present |
| -ftracks or –formattracks number | Number of Tracks to Format Default = 42 if not present |
| -fsides or –formatSides sides | Number of Sides Default = 1 if not present |
python3 DSKInfoV3.py -format NewDataDSK.dsk
Will create a DATA Format Disk with 42 Tracks, One Side.
python3 DSKInfoV3.py -f -ft 2 -ftracks 80 -fsides 2 NewDoubleSidedIBM.dsk
Creates a Double Sided IBM Formatted DISK Image with 80 tracks.
Extract Files from DSK to the OS File System
Currently this feature will extract all valid files it finds to your OS File System. It must be used in conjunction with the -dir command.
python3 DSKInfoV3.py -dir -ex DizzyHackTutorial.dsk

Since CPM has the concept of “Users” the user number will always prefix the filename. The files will be extracted to the current directory you are running the tool from, if you’re running the command line tool over many files you may want to create a script to move the files to another folder/directory for each disk.
That’s all for now!
I don’t know what value the tool will provide, this was just an easy way to help me with looking at my Amstrad Disks with my hacks from days of old, to extract files and examine disk images.
There are limitations with the DSK File format, for example only 29 Sectors can be stored per track, which for most disks is more than adequate. Some protection systems used false headers and other tricks in an attempt to prevent copying using available tools back in the day.
I write a disk protection system that could be mastered on the Amstrad CPC but could not be copied on the AmstradCPC, by manipulating GAP#3 information, misreporting the number of valid sectors and other tricks. The DSK Format doesn’t handle this information particularly well at all.
Additionally I’m aware of a proposed Extension to the DSK file format from Simon Owen :
https://simonowen.com/misc/extextdsk.txt
This adds a final eye catcher and record to the file called “Offset-Info”, the idea being to capture the true number of bytes for disks that used the 6K Sector Protection system from Speedlock or the Hex Sector protection. There are many disks in the wild with this extension present, however currently this tool ignores this data. I may add support at a later date.
The tool will be under development based on current needs and workloads. Being opensource you can contribute to the project should you find it helpful or find bugs/features that may be helpful.
I may add functionality to add external files to a new disk image. Though for the times I need it, JavaCPC’s DSK Util has some amazing features all from a powerful UI.
If you find any technical inaccuracies or info that I’m unaware of and need to include in this post, let me know in the comments below!


I tried this on a CPC Disk for Nevada Pascal 4 (Nevada Pascal ver 4.1 (UK) (Face A) (128K) (1985) (CPM) (Version CPC 6128) [Original] [UTILITAIRE].dsk) from CPCPower, it didn’t like the format (not multiple of 256) and -dir -ex did not extract files. The disk works fine under CPC emulators. I’d love that this is corrected. Email me if you want me to email the disk image.
Cheers
Richard (retro cp/m enthusiast)
LikeLiked by 1 person
Whoops – My mistake – disk size error still exists. but extract files worked ok.
Cheers
Richard
LikeLiked by 1 person
No problem. I suspect the DSK image contains the offset-info tag at the end of the file. This doesn’t conform to a 256 byte aligned boundary and will generate the error message. You can ignore the error if the files extracted. Though would be keen to check to make sure it’s correct if you’re able to let me know your email address via the contact option on my website. (About) kind regards, Jason
LikeLike
Hi, hopefully you will get my email address now, re Nevada Pascal Disk
LikeLike
I find that my CPC Nevada Pascal 4.1 disks can be file extracted with “Managedsk” and appear to work afterwards, however I find that your python script DSKInfoV3.py corrupts the files on extraction
e.g. Python DSKInfoV3 NP41A.dsk -dir -ex run in sequence across NP41A.DSK, NP41B.dsk, NP41C.dsk, NP41D.dsk leads to corruption such that EXEC4 VERIFY won’t work correctly, should prompt for a file name.
If you email me I can return the disk images by email or you can download from https://www.cpc-power.com/index.php?page=detail&onglet=dumps&num=6875.
In the first paragraph above I mention that the files “appear to work”. This is because EXEC4 VERIFY across all the files gives checksums, but they don’t match those in the readme file. I suspect there may be a version mismatch between the files and those checksums.
LikeLike
Hi Richard, apologies for the delay. Since your previous message I’ve discovered my website contact page wasn’t working. I’ve made some changes, and would be grateful if you can use that form to send me your email address. And I can take a look as to what’s going on. Alternatively a FB message via https://www.facebook.com/MuckypawsLabs/ would work too. Kind Regards, Jason
LikeLike
Scratch that, found your email address and sent you a message. Kind Regards, Jason
LikeLike
Hi Jason,
Thank you for explaining the format so clearly. However, I still have some questions:
How do you know where to find the directory entries? I thought it was based on the sector ID (01=Track 1, 41=Track 2, C1=Track 0) but that soon turned out to be wrong (found a disk with Sector ID of 01 and directory entries at Track 0).
The number of tracks specified in the header – is this per side or in total? I’m assuming it is per side, as most of the images I have are single sided 40 tracks. However, I have a couple (the only two samples I have) of double sided images which are 80 track per side (160 tracks in total).
Finally – the cluster number. How do we calculate which side it is on? I’ve got the track and sector, but not the side.
Many thanks,
Gerald.
LikeLiked by 1 person
Hi Gerald,
That’s a great question…
In the tool and blog post I wrote, I’m working from the standard CPC DSK layout and CP/M-style directory structure. In that layout, the directory entries are read from Track 0, Sector C1 for normal DATA-format Amstrad disks, and the track header itself records the head/side number (0 = Side A, 1 = Side B). 
The sector IDs such as:
01 = IBM-style format
41 = CP/M / vendor-style format
C1 = DATA format
are useful as format indicators, but they do not always tell you on their own where the directory will be on every image. In other words, they are a strong clue to the disk layout, but not a universal rule for all possible disks or custom formats.
For the number of tracks in the DSK header, I treat that as tracks per side, not the total across both sides. So an 80-track double-sided image would normally mean 80 tracks per side, with the side determined separately from the Head field in each track header. 
On the cluster number question, the cluster itself does not directly encode “side” in the directory entry. You derive that from the disk geometry when converting the cluster to its corresponding track and sector, and for double-sided images the relevant side is then indicated by the track/header structure rather than by the cluster byte alone.
If you’ve found images where the directory is on Track 0 even though the sector ID pattern looks like 01, that suggests either:
a non-standard or loosely written DSK image,
a custom disk format,
or a case where my current assumptions may need extending.
I’d genuinely be interested in looking at your double-sided 80-track samples, as real-world images are often the best way to catch edge cases that documentation glosses over.
If you’re happy to share them, send me a note via the contact form on the site with your email address and I’ll get back to you. I tend not to publish my email address openly these days, mainly because of spam.
Kind regards
Jason
LikeLike
Hi Jason,
You can get me at xxx@yyyy.co.uk.
Cheers,
Gerald.
LikeLiked by 1 person
Thanks Gerald,
I’ve sent you an email, and edited out your real address to try and prevent scrapers adding it to their spam databases.
Kind Regards
Jason
LikeLike