
Headless Raspberry Pi Desktop Installation
I’ve been working with the Raspberry Pi on various home projects since the release of the first Raspberry Pi. The more interesting projects I will share with you over the coming year. To reduce repetitiveness, this article explains how to install and configure a Raspberry Pi with Debian OS without the need to plug your Pi into an external Keyboard, Mouse and Monitor. As an optional extra, I’ll show you how to enable VNC if you want to remotely connect to the Pi desktop.
What Do I Need?
Hardware List
| Item | Link | Approx Cost |
|---|---|---|
| Raspberry Pi | https://thepihut.com/collections/raspberry-pi | From £5 |
| Micros SD Card | https://www.amazon.co.uk/SanDisk-microSDHC-Memory-Adapter-Performance/dp/B073K14CVB | From £6 |
| Optional Keyboard | https://www.amazon.co.uk/Arteck-Ultra-Slim-Bluetooth-Compatible-10-2-inch-Black/dp/B07V5LWSN5 | £16 |
| Optional Mouse | https://www.amazon.co.uk/TeckNet-Bluetooth-Adjustable-Wireless-Cordless-Black/dp/B07GQXNG4F | £14 |
| Approximate Total Cost | £11+ |
Software List
| Software | Link |
|---|---|
| Official Raspberry Pi Imager | https://www.raspberrypi.org/software/ |
| Balena Etcher (Optional Alternative) | https://www.balena.io/etcher/ |
| PuTTY (Windows Users) | https://www.chiark.greenend.org.uk/~sgtatham/putty/latest.html |
| extFS by Paragon (Optional) | https://www.paragon-software.com/home/linuxfs-windows/ |
| Official SD Card Formatter (Optional) | https://www.sdcard.org/downloads/index.html |
| VNC Viewer (Optional) | https://www.realvnc.com/en/connect/download/viewer/ |
Installing Raspberry Pi-OS to SD Card
If you are starting out with Pi and have limited IT experience I recommend using the official Raspberry Pi Imager. Alternatively if you want to experiment with different builds/OSs like DietPi Balena etcher will serve you well.
This tutorial will use the official tool.
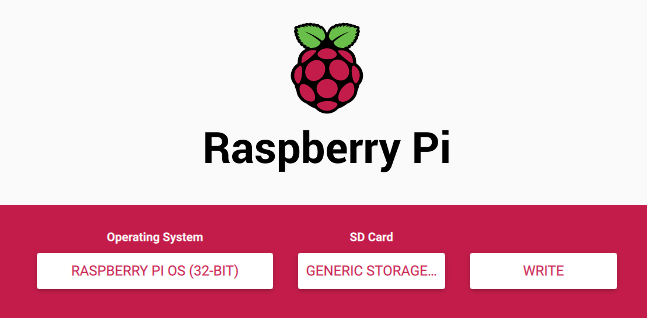
Step 1: Install Raspberry Pi Desktop
If you are using the official Raspberry Pi Imager (https://www.raspberrypi.org/software/)
- Choose Raspberry Pi OS (32 Bit)
- Select your SD Card
- Hit Write
Sit back with a refreshing cuppa Java until the process is complete and your card verified.


The imager automatically dismounts (ejects) the SD card from your device once the write is complete, therefore you will need to physically remove the card and re-insert it to complete the next steps.
Step 2: Enable SSH and WiFi
For headless installation you will need to configure SSH (Secure Shell – needed) and WiFi (If you’re not planning on connecting directly to a wired connection).
Remove and Re-Insert your SD Card to your device and create the following files to enable SSH and WiFi connectivity. If you are a Windows User, Skip Here
macOS
Start a Terminal Session (⌘ + SPACE) and Type “Terminal” and hit return.
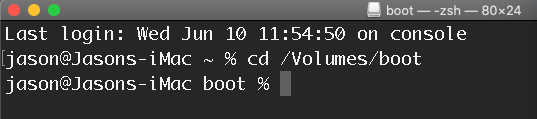
At the command line, type (case Sensitive)
cd /Volumes/boot
You will need to create an Empty File called SSH that will act as a flag to enable SSH.
touch ssh
ls -al ssh

You’ll find an empty file created on the SD Card, which you can check using Finder.
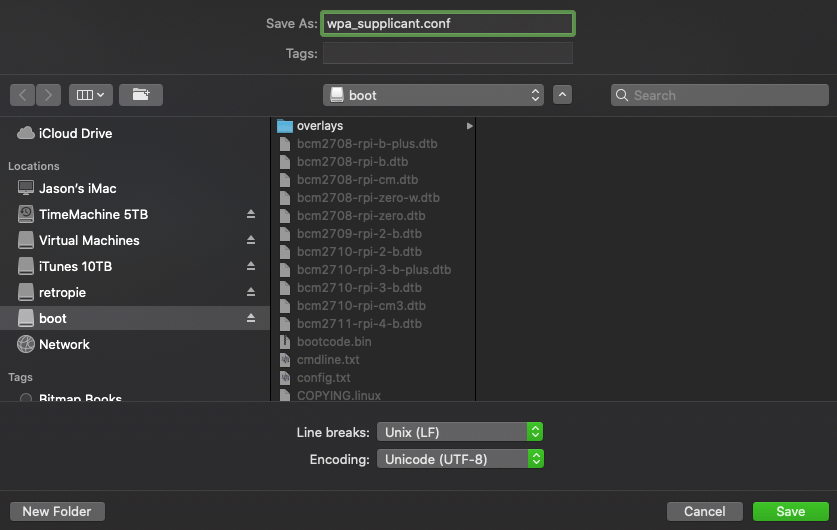
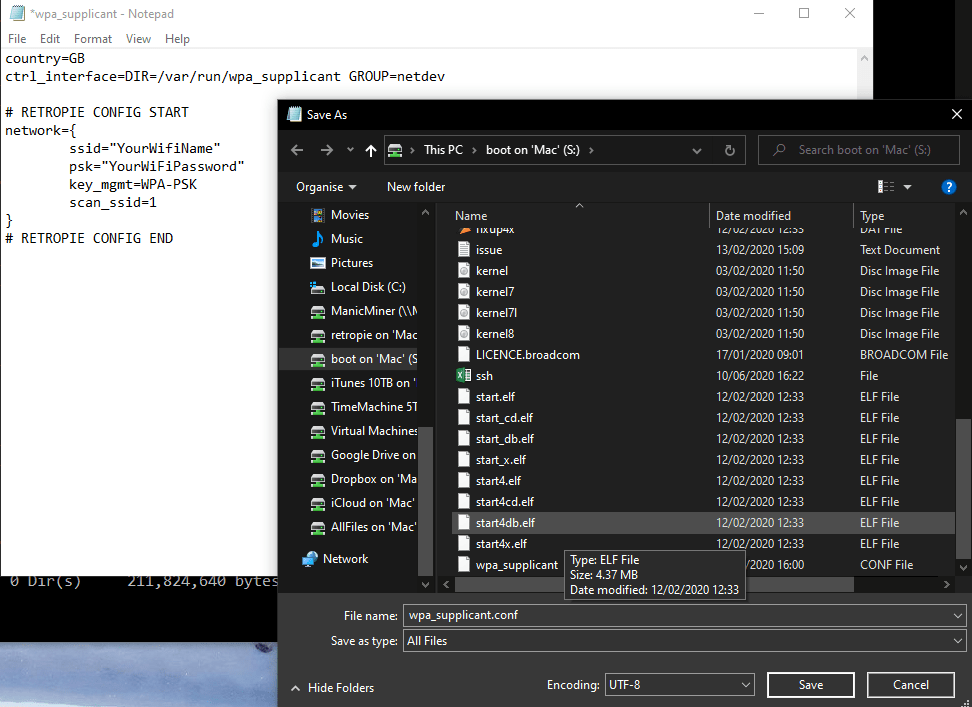
Next you will need to create a file called wpa_supplicant.conf which will contain your WiFi configuration, use your favourite Text Editor to do this, Ideally save the file as Linux and not Windows CR/LF text format.
country=GB
ctrl_interface=DIR=/var/run/wpa_supplicant GROUP=netdev

#RETROPIE CONFIG START
network={
    ssid="YourNetworkName"
    psk="YourWifiPassword"
    key_mgmt=WPA-PSK
    scan_ssid=1
}
#RETROPIE CONFIG END
Save this into the root directory of the SD Card

Now you’re ready to move to the next step.
Windows Users
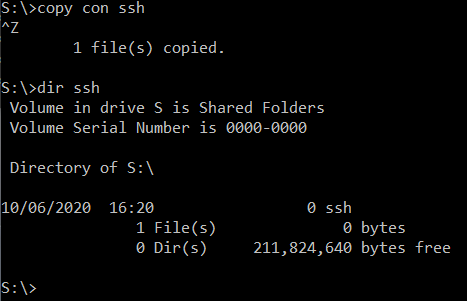
Using Windows Explorer (Windows Key + E) to find the drive letter assigned to the “boot” partition of the SD Card. In my case, this is the S: Drive.

We need to create a blank file in the root of this drive called “ssh” which acts as a flag to enable SSH Services. Start a command prompt by clicking the Windows Logo and type CMD you should see something like this :-

Just click on the Command Prompt (you don’t need to run as administrator for the following tasks), and type the following commands. Substitute the S: command to the drive letter assigned to your SD Card.
S:
DIR

Substitute “S:” with the correct drive on your system. Since Windows doesn’t have a native “touch” command we need to type the following, where you see ^Z replace this with the CTRL+Z keyboard combination and hit Return :-
copy con ssh
^Z
Alternatively you could use the following command :-
fsutil file createnew ssh 0

Next you will need to create a file called wpa_supplicant.conf which will contain your WiFi configuration, use your favourite Text Editor to do this, Ideally save the file as Linux and not Windows CR/LF text format.
country=GB
ctrl_interface=DIR=/var/run/wpa_supplicant GROUP=netdev

#RETROPIE CONFIG START
network={
    ssid="YourNetworkName"
    psk="YourWifiPassword"
    key_mgmt=WPA-PSK
    scan_ssid=1
}
#RETROPIE CONFIG END
That’s the two files we need to create on the Boot partition of the RetroPie Build.
Step 3: The config.txt file
If you’re planning on connecting your Pi to an external screen then depending on the make and model of your HDMI TV/Output you may see a black border, if you do you will need to open and edit the config.txt file on the root partition, and look for a section that has the following :-
# uncomment this if your display has a black border of unused pixels visible
# and your display can output without overscan
#disable_overscan=1
Simply uncomment (remove the #) disable_overscan
The config.txt file contains a host of parameters that can be adjusted for the display and audio hardware that you’re using, but this is typically all we need for the time being.
Config.txt if only using VNC Connection
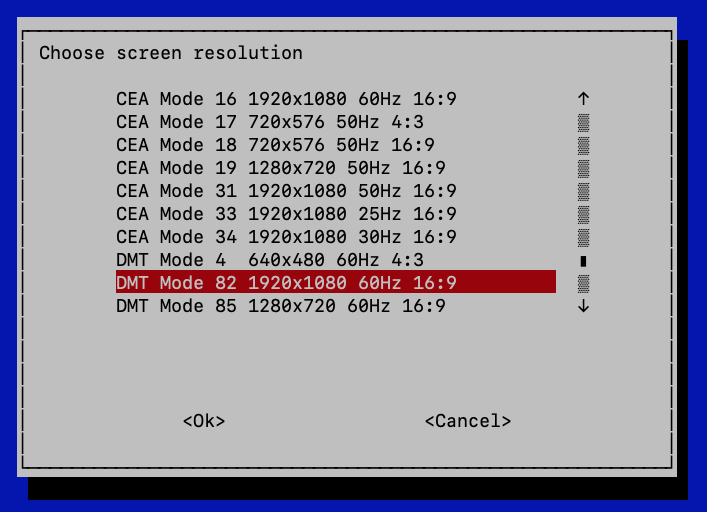
When connecting to the Pi using VNC without a monitor attached, I found that the default display of 1280 x 720 was selected. I attempted to change this in raspi-config and select a default of 1920 x 1080p. After rebooting the Pi, the VNC screen remained at 1280 x 720. The solution is another change to the config.txt file which is needed (Only If you don’t intend to connect to a physical screen).
hdmi_mode is defined here: https://www.raspberrypi.org/documentation/configuration/config-txt/video.md
Changes made to the config.txt file are highlighted below, after a further sudo reboot now command, VNC Displayed the correct requested resolution
 hdmi_force_hotplug=1

 hdmi_group=2
 hdmi_mode=82
 hdmi_ignore_edid=0xa5000080
Step 4: Fire Her Up for the First Boot
You’ve completed the edits, and you’re raring to go, it’s exciting times. Safely eject your SD Card from your device and insert into your Raspberry Pi, power up and wait a couple of minutes, the first boot will automatically resize your disk partition to make use of the SD Card, and then second boot will drop you in at the desktop.
We’re not going to connect a keyboard (unless anythings gone awry). Once the Pi has rebooted the second time, it should connect to your WiFi network (if you entered the correct details), or to your wired network.
Step 5: Connect to the Pi Terminal
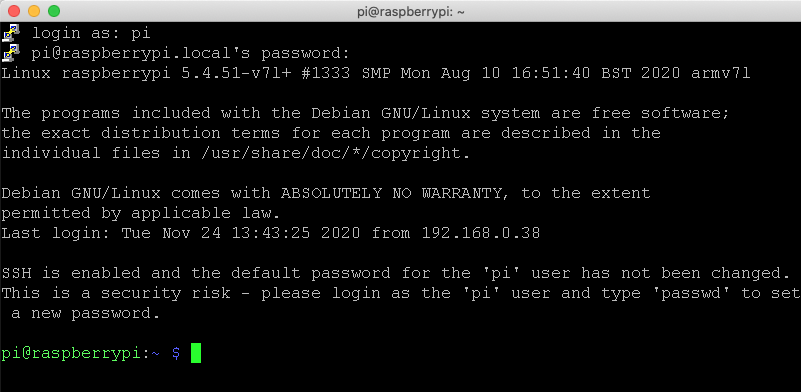
Using macOS, start a Terminal Session and enter the following command, using the default password raspberry. The IP address can be found connecting to your router, or using the following on macOS (and Windows if Bonjour Services are installed).
Jump here if you’re on Windows
macOS Steps
ssh pi@raspberrypi.local
Or you may need to specify the exact IP address
ssh pi@192.168.0.112
jason@Jasons-iMac ~ % ssh pi@192.168.0.112

The authenticity of host '192.168.0.112 (192.168.0.112)' can't be established.

ECDSA key fingerprint is SHA256:&ABFDFxxxxxxmSe9VQE.

Are you sure you want to continue connecting (yes/no/[fingerprint])? yes
Warning: Permanently added '192.168.0.112' (ECDSA) to the list of known hosts.

pi@192.168.0.112's password: raspberry
Linux raspberrypi 5.4.51-v7l+ #1333 SMP Mon Aug 10 16:51:40 BST 2020 armv7l

 The programs included with the Debian GNU/Linux system are free software;
 the exact distribution terms for each program are described in the
 individual files in /usr/share/doc/*/copyright.

 Debian GNU/Linux comes with ABSOLUTELY NO WARRANTY, to the extent
 permitted by applicable law.
 Last login: Thu Aug 20 11:54:39 2020

 SSH is enabled and the default password for the 'pi' user has not been changed.
 This is a security risk - please login as the 'pi' user and type 'passwd' to set a new password.


 pi@raspberrypi:~ $
Windows Steps
Using PuTTY enter either the IP Address of the Pi, or if Bonjour Services are installed use raspberrypi.local


Step 6: Command Line Stuff and Update
Now you’re logged on to your Pi, you will need to run the following command line stuff to update your OS and pick up any patches/fixes. It’s important to remember that commands shown below are case sensitive, so please type exactly as shown.
More information can be found here: https://www.raspberrypi.org/documentation/raspbian/updating.md
sudo apt update -y

sudo apt full-upgrade -y

sudo apt clean

sudo reboot now
This process may take several minutes, depending on the amount of patches required and network speeds, sit back, enjoy another cuppa like a true IT Professional…
Step 7: Change your Hostname and password
This step is important since your Pi will be configured with all the defaults which are known to hackers worldwide, this is a basic security step.
Using PuTTy or SSH log back into your Pi using Step 5: above and enter the following commands
sudo raspi-config

Select System Options (1) and hit return, using the cursor keys and select Password

You will be returned to the command prompt to change your password, enter your new password twice and you’ll be returned to the menu. Now select Option 4


Hit return, your hostname will change when you’ve rebooted your Pi. This means that when accessing your Pi remotely in Step 5, you will need to replace raspberrypi.local with YourNewHostName.local, in my example flightaware.local
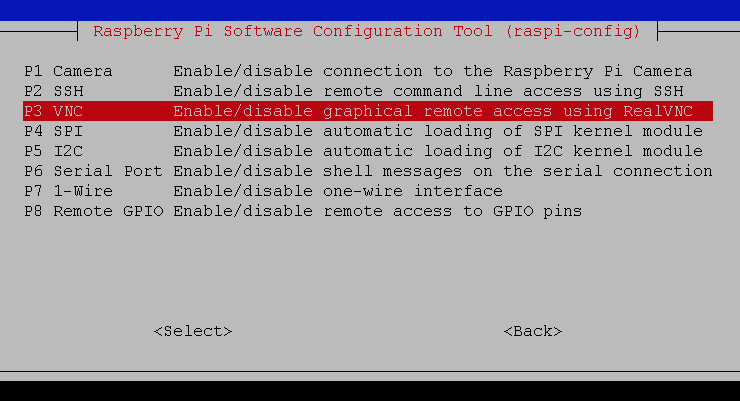
Step 8: Optional VNC Support
Skip this step if you don’t plan on needing VNC (Remote Desktop Support), it’s useful on your internal network, it can be a security nightmare if you open this up to a public facing internet connection.
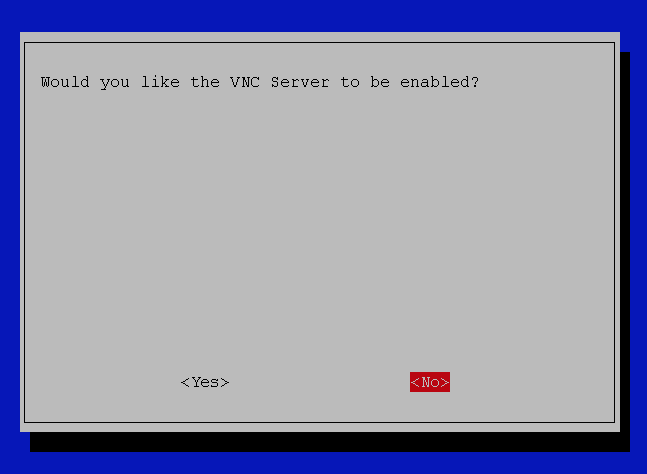
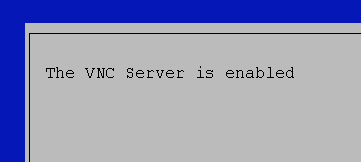
Whilst in the raspi-config menu, go to option 3 – Interface Options and select VNC and select YES or NO if you’re disabling VNC support. I recommend only enabling this feature when you actually need to access the desktop.

This next step is important, otherwise your realVNC Client may display a blank screen when trying to connect.
Go to option 2 in the menu and select Resolution, and choose a resolution that will work well with the device you’re going to be working from. I’m using 1920 x 1080 as my monitors are 5K resolution, if you’re using something smaller, then choose a screen size appropriate for you.


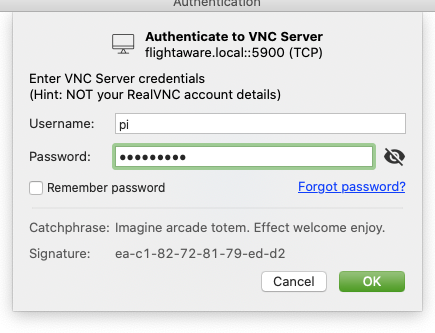
To be able to access your Pi, you will need to download the RealVNC Viewer
Step 9: Reboot Your Pi
That’s the remote configuration complete, all that remains is to reboot your Pi for the changes to kick in.
If you’re at the command line type the following :-
sudo reboot now
If you’re still in the raspi-config menu, you will be asked if you wish to reboot on exit.

Remember, if you changed your hostname, you will need to make the relevant changes in Step 5 to log back into your device.
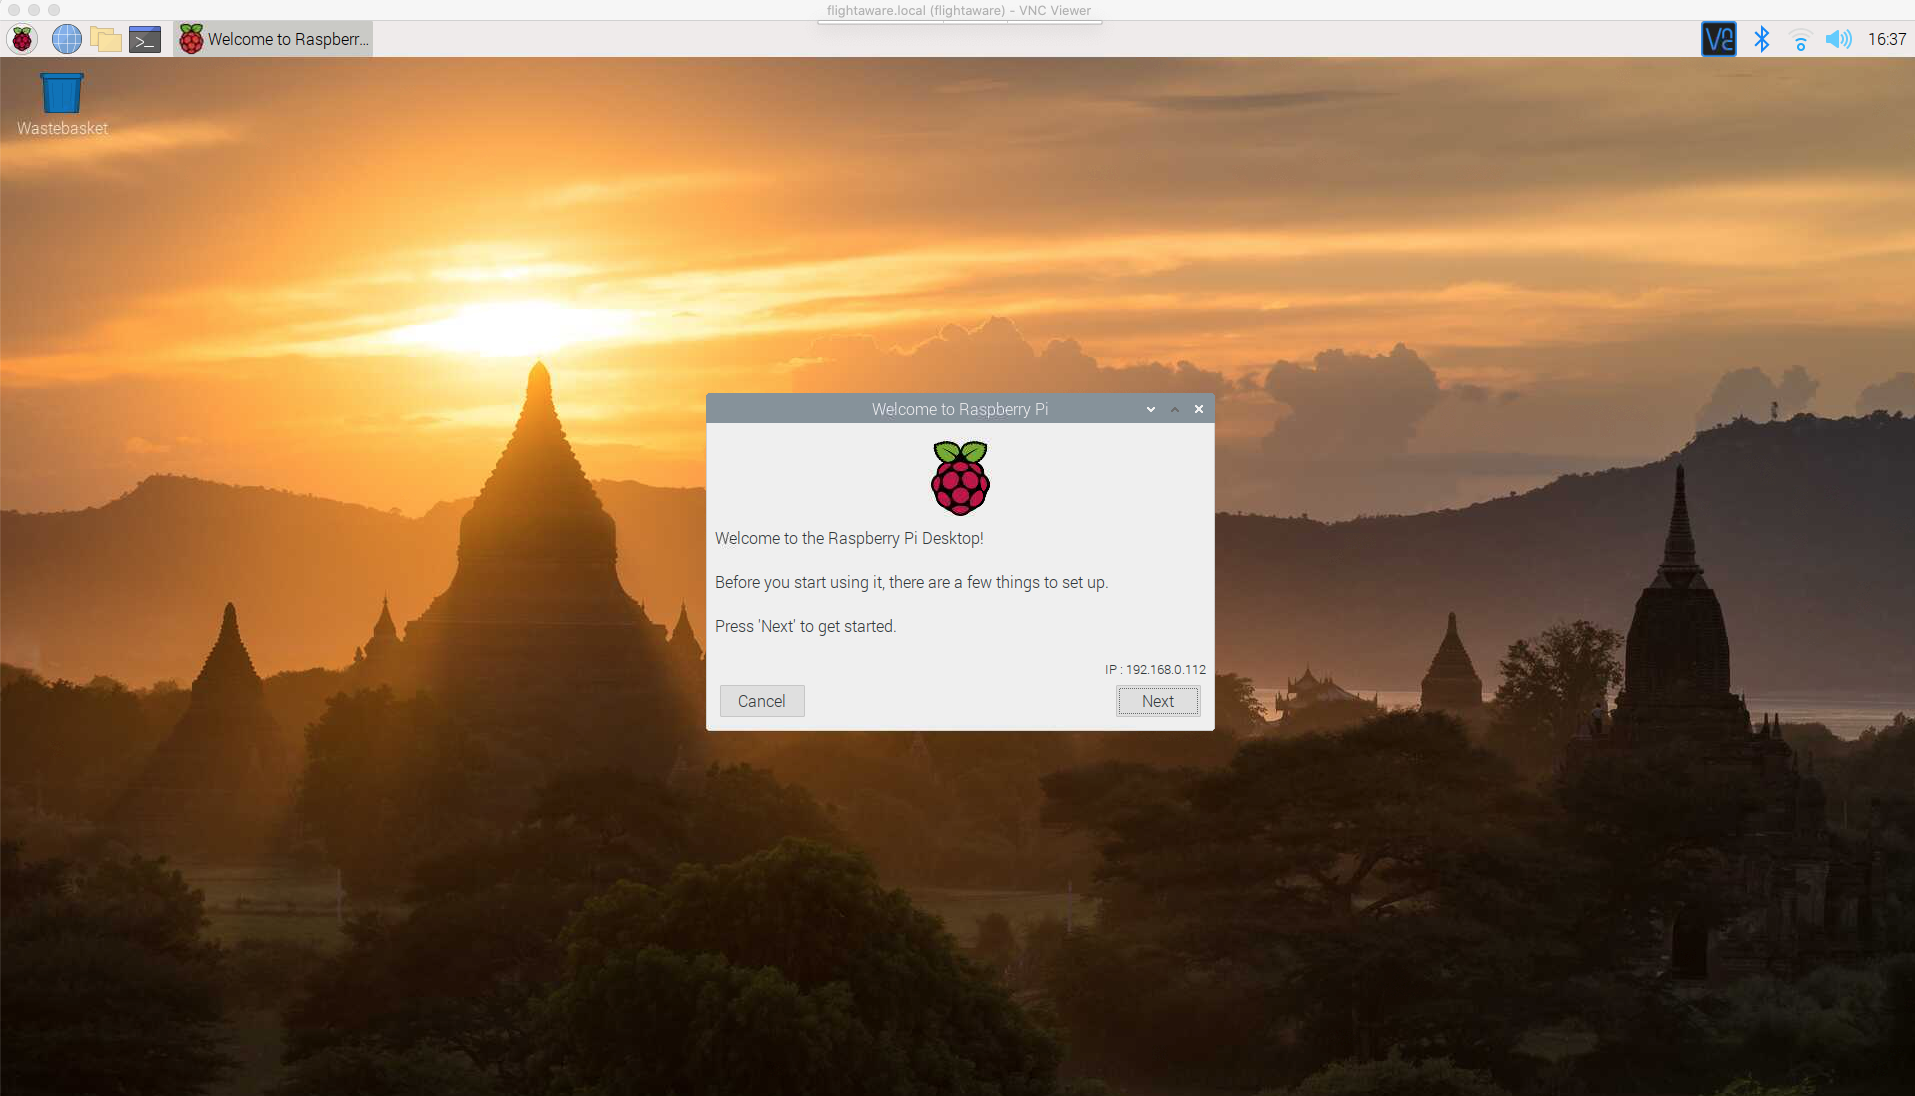
Once the Pi has completed it’s reboot, try and connect to the desktop using VNC Viewer.


That’s All Folks!
If you’ve followed this article, you will have a fully configured default Raspberry Pi which you’ve build and are able to connect to remotely without the need of additional screens or hardware.
If you’ve found this article useful, pease consider subscribing to my blog, if you’ve found errors/omissions or clarity required, drop me a message below.


Muchas gracias. ?Como puedo iniciar sesion?
LikeLiked by 1 person
¡Hola! You do need to follow the configuration steps in this article. The later version of the Raspberry Pi Imager has exposed the hidden feature of configuring HOSTNAME, Password and WiFi settings (Click the gear icon) bottom right of the Pi Imager.
If on macOS or Linux, once connected to your network, the default will be
ssh pi@raspberry.local
password: raspberry
Hope this helps.
If there are problems connecting, try connecting the Pi with an ethernet cable to rule that out first.
LikeLike