
3D Printing – Manual Bed Levelling
Getting the first print layer right is key to good quality prototypes and creations. It can be a surprisingly frustrating process, that said, if you spend time getting it right, you will master 3D printing quicker than you expect!
It’s advisable to check your bed levelling and calibration with every print, small changes can occur when removing prints from the bed, moving the printer or even room temperature if you live in hot locations.
The example below shows an unlevelled bed coupled with a nozzle too high. The print won’t recover from this, you can only stop, re-level and start again. This process will make you frustrated, tear your hair out or even want to throw your printer out the window Rock and Roll Styleee, if you bear with it and learn from the challenges, eventually it will all click into place.

I’m sure you’ve followed your manual and used the levelling paper… which is a very good start. Before you start, tighten each bed levelling nut so that the bed is at its lowest point and then back the screw off a couple of turns to give you some adjustment in either direction. Turn the levelling wheels anti-clockwise to tighten (Lower) and clockwise to loosen (Raise) the bed corners.
This step is important! You need to warm your print bed up to your normal operating temperature. For example if you usually print with a bed temp of 55 Degrees, then let the bed heat up BEFORE levelling since bed expansion will play a bigger part in getting the bed level just right.
Using the control panel of your printer, centre the print head, and move the Z-Axis to 0mm, adjust the four screws until the nozzle is just touching the paper with slight pressure felt when you try to move it. Alternatively when the bed touches the nozzle the printer will sound quieter, you can use this to your advantage by tightening the wheel to back the bed off a smidge.
From the printer menu, go to Level Corners and follow the same process, and repeat multiple times until the bed appears to be level.
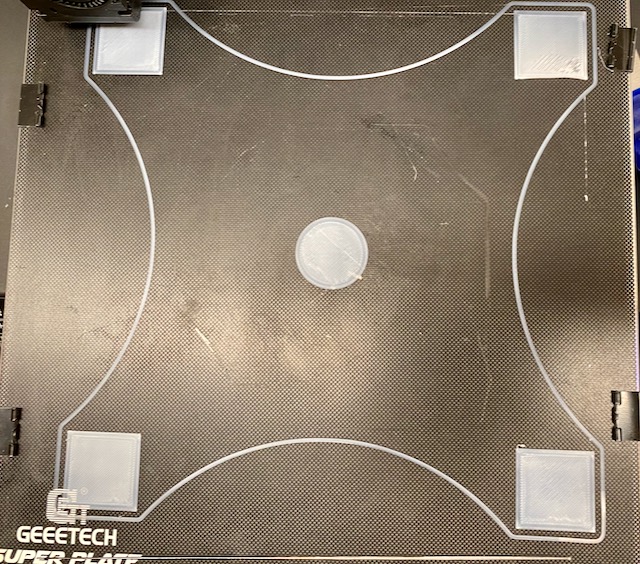
In theory that should work, but how do you ensure your bed really is level? I’ve provided a file on Thingiverse https://www.thingiverse.com/thing:4730920 that puts down four 30mm squares on each corner of your bed, and a 30mm disc in the centre that is 0.2mm hight. It takes around 5 minutes to print being a very quick first layer test, if you select to print with a Skirt, this helps determine how level your bed is by extruding around the outline as shown.

From this print you can gauge if the nozzle is too high/too low or just right. Where the nozzle is too low, plastic will be squished and form blobs, if too high the print will look shredded along the direction of print and easily torn apart due to being brittle. If the levelling is just right, the plastic will be difficult to pull apart looking even and smooth (no blobs or shredding).

I found this rather good resource (albeit quite long) explaining the method of “Live Levelling” and the author provides code and other resources to help.
Seems straight forward? Below shows the extent of testing undertaken to get the bed absolutely as level as possible.

Pronterface
If you have a Bed Levelling Sensor, there are a couple of tools that will help you visualise how level your bed is.
Pronterface has been around for many years and found here: http://www.pronterface.com or take a look at the Git Repository: https://github.com/kliment/Printrun
It’s available on Windows, macOS and Linux, containing many features to print your designs, though today I’m using it for the inbuilt command line interface. Having connected the software to the printer, I use the following commands:-
G28
G29
G28 will automatically home and zero the print head so it knows where on the bed it is.
G29 will probe the surface and provide a list of offsets. The default 1.1.8 BL Touch firmware only probes on 9 points in a 3 x 3 grid array. This gives you a rough idea, though the firmware will require updating to enable 5 x 5 grid array probing to discover a more accurate bed mesh. NB. With glass beds 3×3 is less of an issue than Mylar or PEI Sheets.
The pictures below show the Pronterface Interface and the output from using a command line to drive the printer. The output data is fed into the online tool https://i.chillrain.com/index.php/3d-printer-auto-bed-leveling-mesh-visualizer/ which helps visualise your print bed.
Using the data provided by the printer, you can make fine level adjustments to each corner of the bed and see the end result.
It’s also worth noting, that where you see inconsistent or unexplained peaks in the bed surface and the ned is 100% clean, then its worth checking the Z-Axis wheels and Axel to ensure it’s not bent, dirt, pinching or too tight/loose as this will massively affect your levelling.
In theory, the printer will build an internal mesh and make some adjustments automatically to compensate. You can issue the M500 command to store the current mesh settings into printer storage or M420 V to see what the current bed levelling parameters are set to.


From the visualisation data, the bed is approx 0.1mm out, which is pretty good for manual levelling, more tweaking and fine tuning can be done, though sometimes you just want to get on and print!
Do you have other tips and tricks? Let me know in the comments below!


my Ender 3 nozzle keeps going through the 2nd layer. Is this a layer setting issue? It goes right through it. Its like it isnt raising for the next layer.
LikeLiked by 1 person
It’s going to depend on a number of factors, for example what layer height are you using and what initial layer height?
Have you made adjustments and calibrated your Z-offset?
What happens when you raise the first layer offset? What happens when you change the layer offset to 0.2mm or 0.3mm?
I use an initial layer of 0.3mm and layer height between 0.1 and 0.4 depending on the quality print needed.
Nozzle diameter also makes a difference. I found that using the same layer settings for a 0.8mm nozzle produced the results you’re raising as I hadn’t recalibrated the printer when moving from a 0.4mm nozzle.
LikeLike