
Ground Control to Major Tom – Part 1 – Internal
Have you ever looked up at the sky and wondered what aircraft are flying around above your home? Well wonder no more, this relatively simple Raspberry Pi project will let you have your own flight tracking station from the comfort of your sofa tracking aircraft in real-time whilst contributing to the open-source Flight Tracker project.
The project works by receiving ADS-B (Automatic Dependent Surveillance – Broadcast) signals that are transmitted by all legal aircraft, this info is used to help aircraft determine their position by satellite. The small indoor aerial positioned as high as possible next to a window seems to be capable of picking aircraft up to 150 miles away, which I’m sure you’ll agree is quite impressive. Bear in mind with an internal aerial it won’t work well through walls and should be placed as high as possible with a view of the sky. In my case I received clearest signals in the Southern Direction due to my office window.
Should you want to take your FlightTracking experience further, I’ve added some optional kit to the project that will help. An external aerial is available with up to 400 mile range, which I will cover off in a separate article.
Why would you want to do this? Maybe you have a fascination with aircraft, maybe you fly your own? or it’s just a hobby like train spotting… who knows… What this project does is provide a real-time view of flights near you and provides a feed into the https://flightaware.com project which tracks worldwide air traffic.
As an added bonus, by contributing to the project, you are offered a premium membership worth around $90 a month. You see your own traffic in realtime, and other users traffic with around a two minute delay. Handy if you regularly fly on business and want to know more information about your flight.
To qualify for the membership you will need to leave your tracker running 24×7. Since the RPi is a very low powered device ongoing costs are minimal.
Excited? lets build one…

What do I need?
Here’s the parts list I’m using :-
| Stuff | Where | Notes | Approx. Cost |
| Raspberry Pi | https://thepihut.com/collections/raspberry-pi/products/raspberry-pi-4-model-b | The project will support Pi’s with spare USB Ports like Pi2 I’m using a Pi4-2Gb | £34 |
| Power Supply | https://thepihut.com/products/raspberry-pi-psu-uk | Any USB-C Power Supply capable of delivering 3A 5.1v will suffice. | £7.50 |
| Micro SD Card | https://smile.amazon.co.uk/SanDisk-microSDHC-Memory-Adapter-Performance/dp/B073K14CVB | Any SD Card will suffice, though probably no smaller than 8Gb | £5 |
| Case | https://thepihut.com/products/aluminium-armour-heatsink-case-for-raspberry-pi-4 | Any case will suffice, I’m using the Armour Case since it acts as a heatsink too. | £12 |
| Flight Aware Receiver | https://thepihut.com/products/flightaware-pro-stick-plus-usb-sdr-ads-b-receiver | There is a cheaper version that doesn’t include the filter. | £23.50 |
| Antenna | https://thepihut.com/products/3dbi-ads-b-1090mhz-sma-antenna-w-magnetic-base | This is perfect for the home project. | £5 |
The cost of the project is approx £87, that said you can add this project to an existing Pi Desktop, since it will coexist with other Pi projects, like PiHole, OctoPrint etc.
Running costs are very low as you would expect from the Pi, I’ll update the article once I’ve calculated the months running total.
Optional Parts
If you want to take your project further, you will need some additional items. I’ll cover this off in a future article.
| Stuff | Where | Notes | Approx Cost |
| External Aerial – 1090Mhz ADS-B | https://thepihut.com/products/flightaware-1090mhz-ads-b-antenna-66cm-26in | You will need additional fittings if you don’t already have an aerial mast. | £44 |
| SMA-Male to N-Type Male Antenna Cable | https://thepihut.com/products/sma-male-to-n-type-male-antenna-cable-5m | Available pre-made in lengths up to 10m | £5-£11 |
| ADS-B 1090Mhz Filtered Preamplifier | https://thepihut.com/products/ads-b-1090mhz-filtered-preamplifier | Clean an improve the signal processing, especially in urban areas. | £43.50 |
| 1090Mhz ADS-B Bandpass SMA Filter | https://thepihut.com/products/flightaware-1090-mhz-ads-b-bandpass-sma-filter | Additional signal filtering. | £17 |
| SMA Coupler | https://thepihut.com/products/sma-coupler-sma-male-to-sma-male | For joining the main aerial and cable to the pre-amplifier. | £2 |
| USB to Mini-USB Cable | https://smile.amazon.co.uk/AmazonBasics-Male-Mini-B-Cable-Feet/dp/B00NH11N5A | Got loads of these knocking about as I’m sure you will. | £5 |
The external aerial will give your project a boost in signal performance and receive more traffic. The external aerial needs to be mounted along with appropriate cable holes to pass the aerial cable through to your Pi, the results are worth it, though the additional costs of around £122 can be off putting. That said it’s not required as the indoor aerial gives reasonable coverage given the signal has to penetrate glass. It doesn’t work too well with brick, or if you have the foil insulation stuff on your roof.
Another point to note with the fully indoor solution is the direction of traffic detected will be focused on the direction your window faces and can be up to 150 miles (Realistically 50-100 miles).
Lets Crack On
Here’s the steps we’ll take :-
- Install the Pi Desktop Software (you could use Diet Pi).
- Configure WiFi (If you’re not using an Ethernet Cable)
- Install Flight Tracker Software
I wrote an article that will be common across all Pi projects I’ll be sharing with you showing you how to configure and install Raspbian: https://muckypaws.com/2021/01/07/headless-raspberry-pi-desktop-installation/
After Desktop or OS Installation
Welcome back, now you have a configured and working Raspberry Pi and Desktop, the Flight Tracking software needs to be installed.
When I first got involved with the project, the installation was a complicated process if you were installing into an existing Pi Desktop (Version 3). Version 4 has simplified the installation process and more user friendly installation which is described here: – https://flightaware.com/adsb/piaware/install
Essentially the following will install and configure a new PiAware Flight Tracker.
wget https://flightaware.com/adsb/piaware/files/packages/pool/piaware/p/piaware-support/piaware-repository_4.0_all.deb

sudo dpkg -i piaware-repository_4.0_all.deb

sudo apt-get update -y
sudo apt-get install piaware -y

sudo piaware-config allow-auto-updates yes
sudo piaware-config allow-manual-updates yes

sudo apt-get install dump1090-fa -y

sudo apt-get install dump978-fa -y

sudo reboot now
Before rebooting, insert the Flight Tracking Dongle into one of the USB3 ports, and this will be automatically detected and needs to be present on boot for the automatic services to start.
A point to not is the dongle isn’t Pi Port friendly, the physical size will block additional ports and the Ethernet port. If this is an issue, you will need a USB Extension cable.
How to Check the installation is complete.
Once the reboot has taken place, using the command line enter the following commands: –
systemctl status piaware


 ● piaware.service - FlightAware ADS-B uploader
    Loaded: loaded (/lib/systemd/system/piaware.service; enabled; vendor preset: enabled)
    Active: active (running) since Mon 2021-02-08 11:39:04 GMT; 1h 16min ago
      Docs: https://flightaware.com/adsb/piaware/
  Main PID: 601 (piaware)
     Tasks: 4 (limit: 3860)
    CGroup: /system.slice/piaware.service
            ├─ 601 /usr/bin/piaware -p /run/piaware/piaware.pid -plainlog -statusfile /run/piaware/status.json
            ├─ 675 /usr/lib/piaware/helpers/faup1090 --net-bo-ipaddr localhost --net-bo-port 30005 --stdout --lat
            └─1051 /usr/lib/piaware/helpers/fa-mlat-client --input-connect localhost:30005 --input-type dump1090 --re
Or from the web browser use the IP Address of the Pi, flightaware.local:8080 if on another device or 127.0.0.1:8080 in your web browser on the Pi:-

Don’t be disheartened if you only see one or two aircraft, it can take up to five minutes or more to complete the synchronisation process.
Registering Your Device
Finally, you will need to register your device with FlightAware to take advantage of membership and claim your device ID. Follow the instructions at https://uk.flightaware.com/account/join/
See this error message?

Some common reasons are: –
- Check your USB Flight Tracking Decoder Dongle is plugged into a USB Port that has sufficient power.
- The Pi is connected via WiFi and has lost signal/range (Requires a restart of the service).
- The dump1090 process has crashed and may need reporting to the flightaware support team!
sudo systemctl restart dump1090-fa
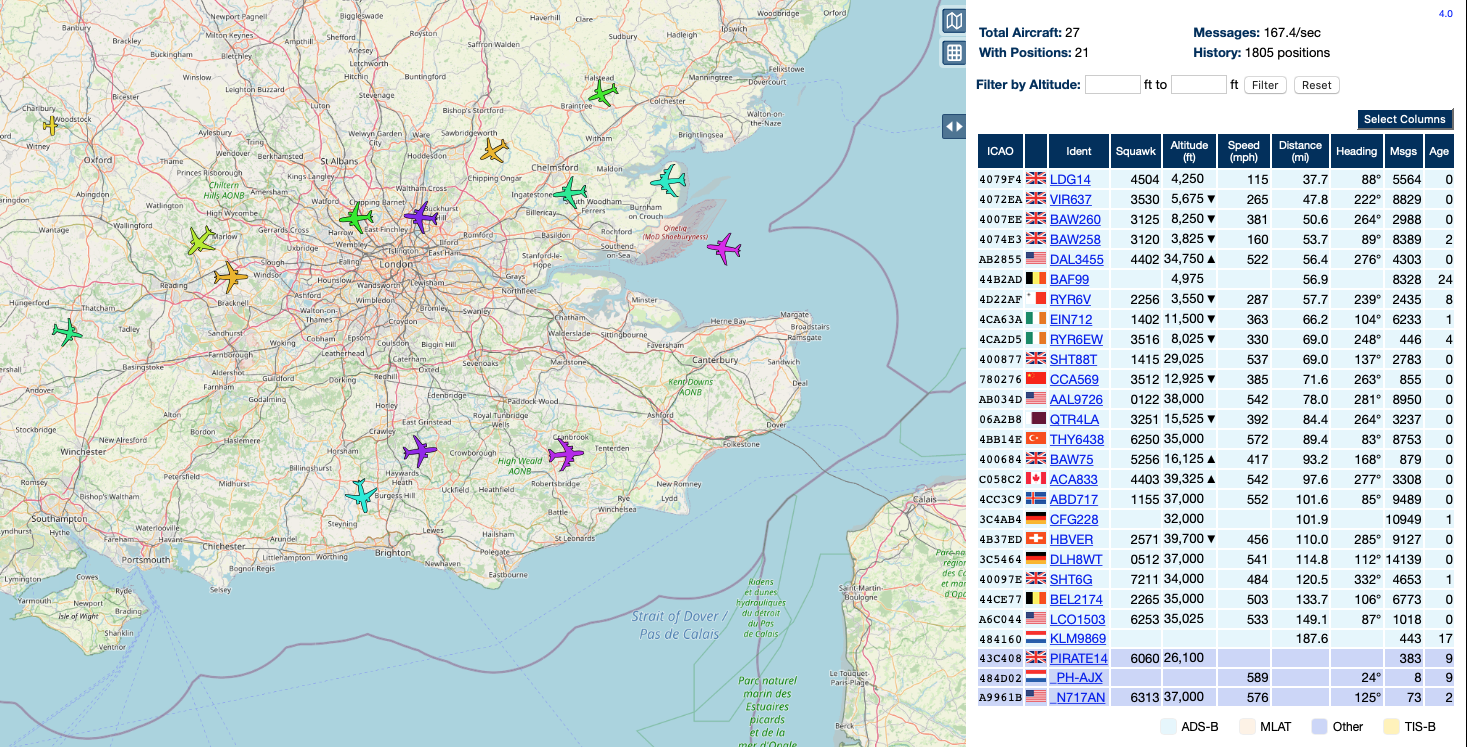
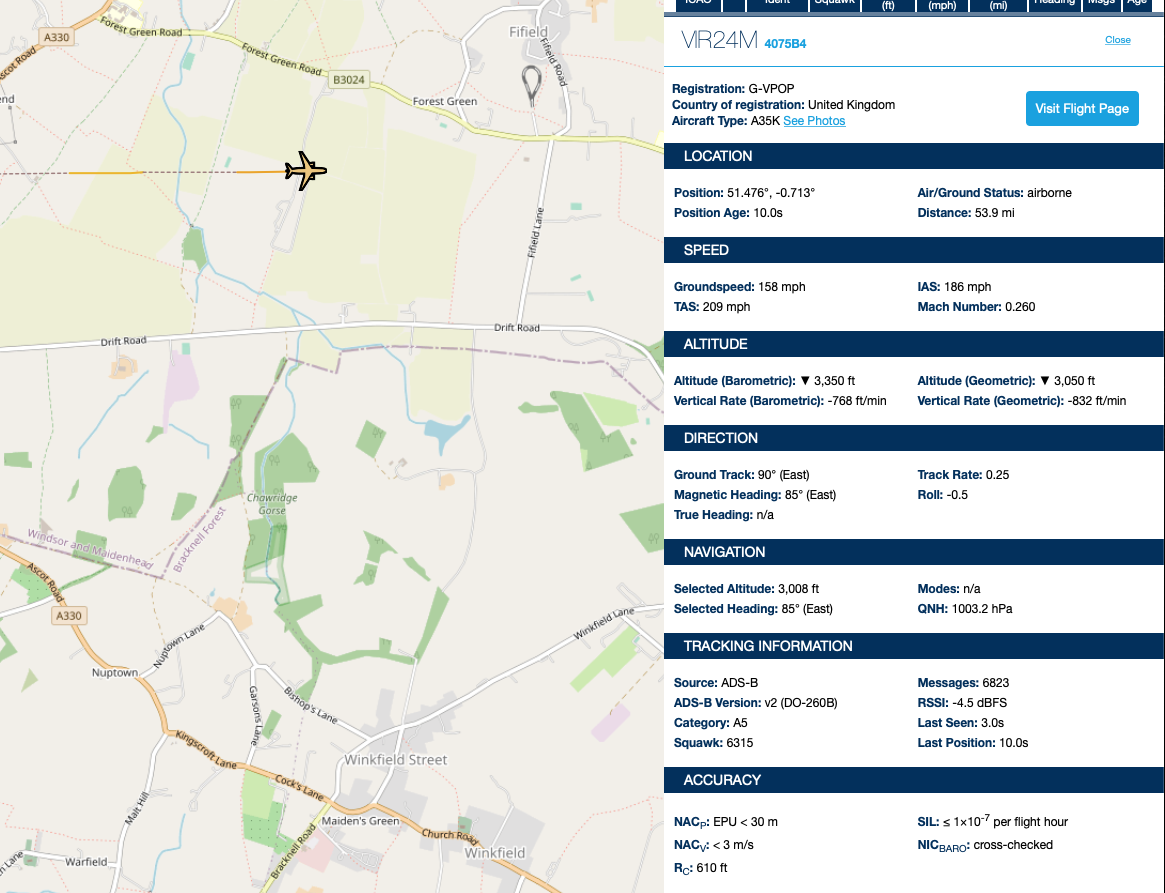
Aircraft Information
Now you have your map and dashboard up and running, you can obtain a wealth of information about a flight. Click on one of the aircraft and its relevant information including telemetary data is available, including alititude, GPS Location, Ascend/Descend Rates, Airspeed etc, and a Hyperlink takes you to more information about the flight itself. It’s fascinating stuff, if that’s your kind of thing!

Congratulations! You’re up and running… What next?
Depending on the type of decoder dongle purchased you may need to play with the gain of the decoder. The following will set automatic gain.
sudo piaware-config rtlsdr-gain -10
You can find more information on the parameter here: https://uk.flightaware.com/adsb/prostick/setup/ At the time of writing no further information is provided for V4.0 of the FlightAware software. I can confirm it works for me.
Need to Stop/Start or Restart the PiAware Services?
Useful command lines :-
sudo systemctl start piaware
sudo systemctl stop piaware
sudo systemctl restart piaware
Display the current configuration
sudo piaware-config

sudo piaware-config -showall
More information can be found at the projects GitHub Repository https://github.com/flightaware/piaware
I hope you found this useful, if you’ve built a Flight Tracker, please share your experiences in the comments below.


3 Comments »